Create a pixel in Meta Events Manager under Connect Data Sources > Web, copy the Pixel ID, then install it with a Google Tag Manager Custom HTML tag set to fire on All Pages. Verify it with the Meta Pixel Helper Chrome extension: a green checkmark with a PageView event means it's working.
By the end of this tutorial, you’ll have the Meta Pixel installed on your website, tracking visitor activity and ready to power your Facebook and Instagram ad campaigns. We’ll install it through Google Tag Manager, test it, and set up your first conversion event.
One naming note before we start. Meta renamed the Facebook Pixel to the Meta Pixel in 2022, and everyone still calls it the Facebook Pixel anyway. Same code, same job. We’ll use “Meta Pixel” here because that’s what the tools now say on screen.
What is the Meta Pixel (and why do you need it)?
The Meta Pixel is a small piece of code that tracks what people do on your website after they interact with your Facebook or Instagram ads.
In plain English: it connects your website to your Meta ad account. You see which ads lead to real actions (purchases, signups, page visits), and Meta can find more people like your best customers.
The pixel does three things for you:
- Tracks conversions from ads. When someone clicks your ad and then buys or signs up, the pixel reports it back, so you know which campaigns pay for themselves. This is the Meta half of how conversion tracking works across your marketing.
- Builds retargeting audiences. The pixel keeps a rolling list of your website visitors, so you can show ads to people who visited a pricing page but didn’t buy.
- Feeds Meta’s ad delivery. The more conversion data the pixel sends, the better Meta’s algorithm gets at finding the right people for your ads.
Not sure what a pixel is in the first place? Start with our plain-English explainer on what a marketing pixel is, then come back here.
Before you start
You’ll need three things:
- A Meta Business Suite account. This is the free business layer on top of your Facebook page, at business.facebook.com.
- A Facebook ad account. Even if you’re not running ads yet, the pixel lives alongside one.
- Google Tag Manager installed on your site. If it isn’t yet, follow our guide to install Google Tag Manager first. It takes about 15 minutes.
You can install the pixel without GTM (see the FAQ below), but this guide uses GTM because it’s cleaner to manage alongside your other tracking. New to GTM in general? The Google Tag Manager tutorial covers tags, triggers, and how the pieces fit.
If your site gets visitors from the EU, UK, or other regions with consent laws, the pixel should fire only after a visitor accepts tracking cookies. A cookie consent banner integrated with GTM handles this for you. For the background, read how pixels and privacy rules interact.
Step 1: Create your Meta Pixel
First, create the pixel inside Meta’s Events Manager. Events Manager is the section of Meta Business Suite where all your tracking lives.
Open Events Manager
Go to business.facebook.com/events_manager2, or open Meta Business Suite and pick Events Manager from the All tools menu. Make sure the correct business account is selected in the top-left corner.
Connect a web data source
Click Connect Data Sources in the left sidebar, choose Web, then click Connect. You may see an extra confirmation screen asking you to pick Meta Pixel and click Connect again; Meta occasionally reshuffles these screens, but the flow is always Connect Data Sources, then Web, then create the pixel.
Events Manager Connect Data Sources WebNewer accounts may label this a dataset instead of a pixel. That’s Meta’s current umbrella name for a source of event data. A web dataset and a pixel are the same thing for our purposes, and the ID works identically.
Name it and create it
Name your pixel after your website or business (for example, “Acme Co Website”), then click Create. If Meta asks how you want to connect your website, you can close that dialog or pick Do it yourself. We’ll handle the install in GTM.
a Pixel ID: a long number (usually 15 or 16 digits) shown at the top of your pixel’s page in Events Manager. Copy it somewhere handy. You’ll paste it into GTM in the next step.
Step 2: Install the pixel with Google Tag Manager
Now we’ll put the pixel’s base code on every page of your site using a GTM Custom HTML tag. A Custom HTML tag is GTM’s container for any script that GTM doesn’t have a built-in template for, and the Meta Pixel is the classic use case.
Create a new tag
In Google Tag Manager, open your container and click Tags in the left sidebar, then New. Name the tag “Meta Pixel - Base Code” so future you knows exactly what it is.
GTM Tags NewChoose Custom HTML and paste the code
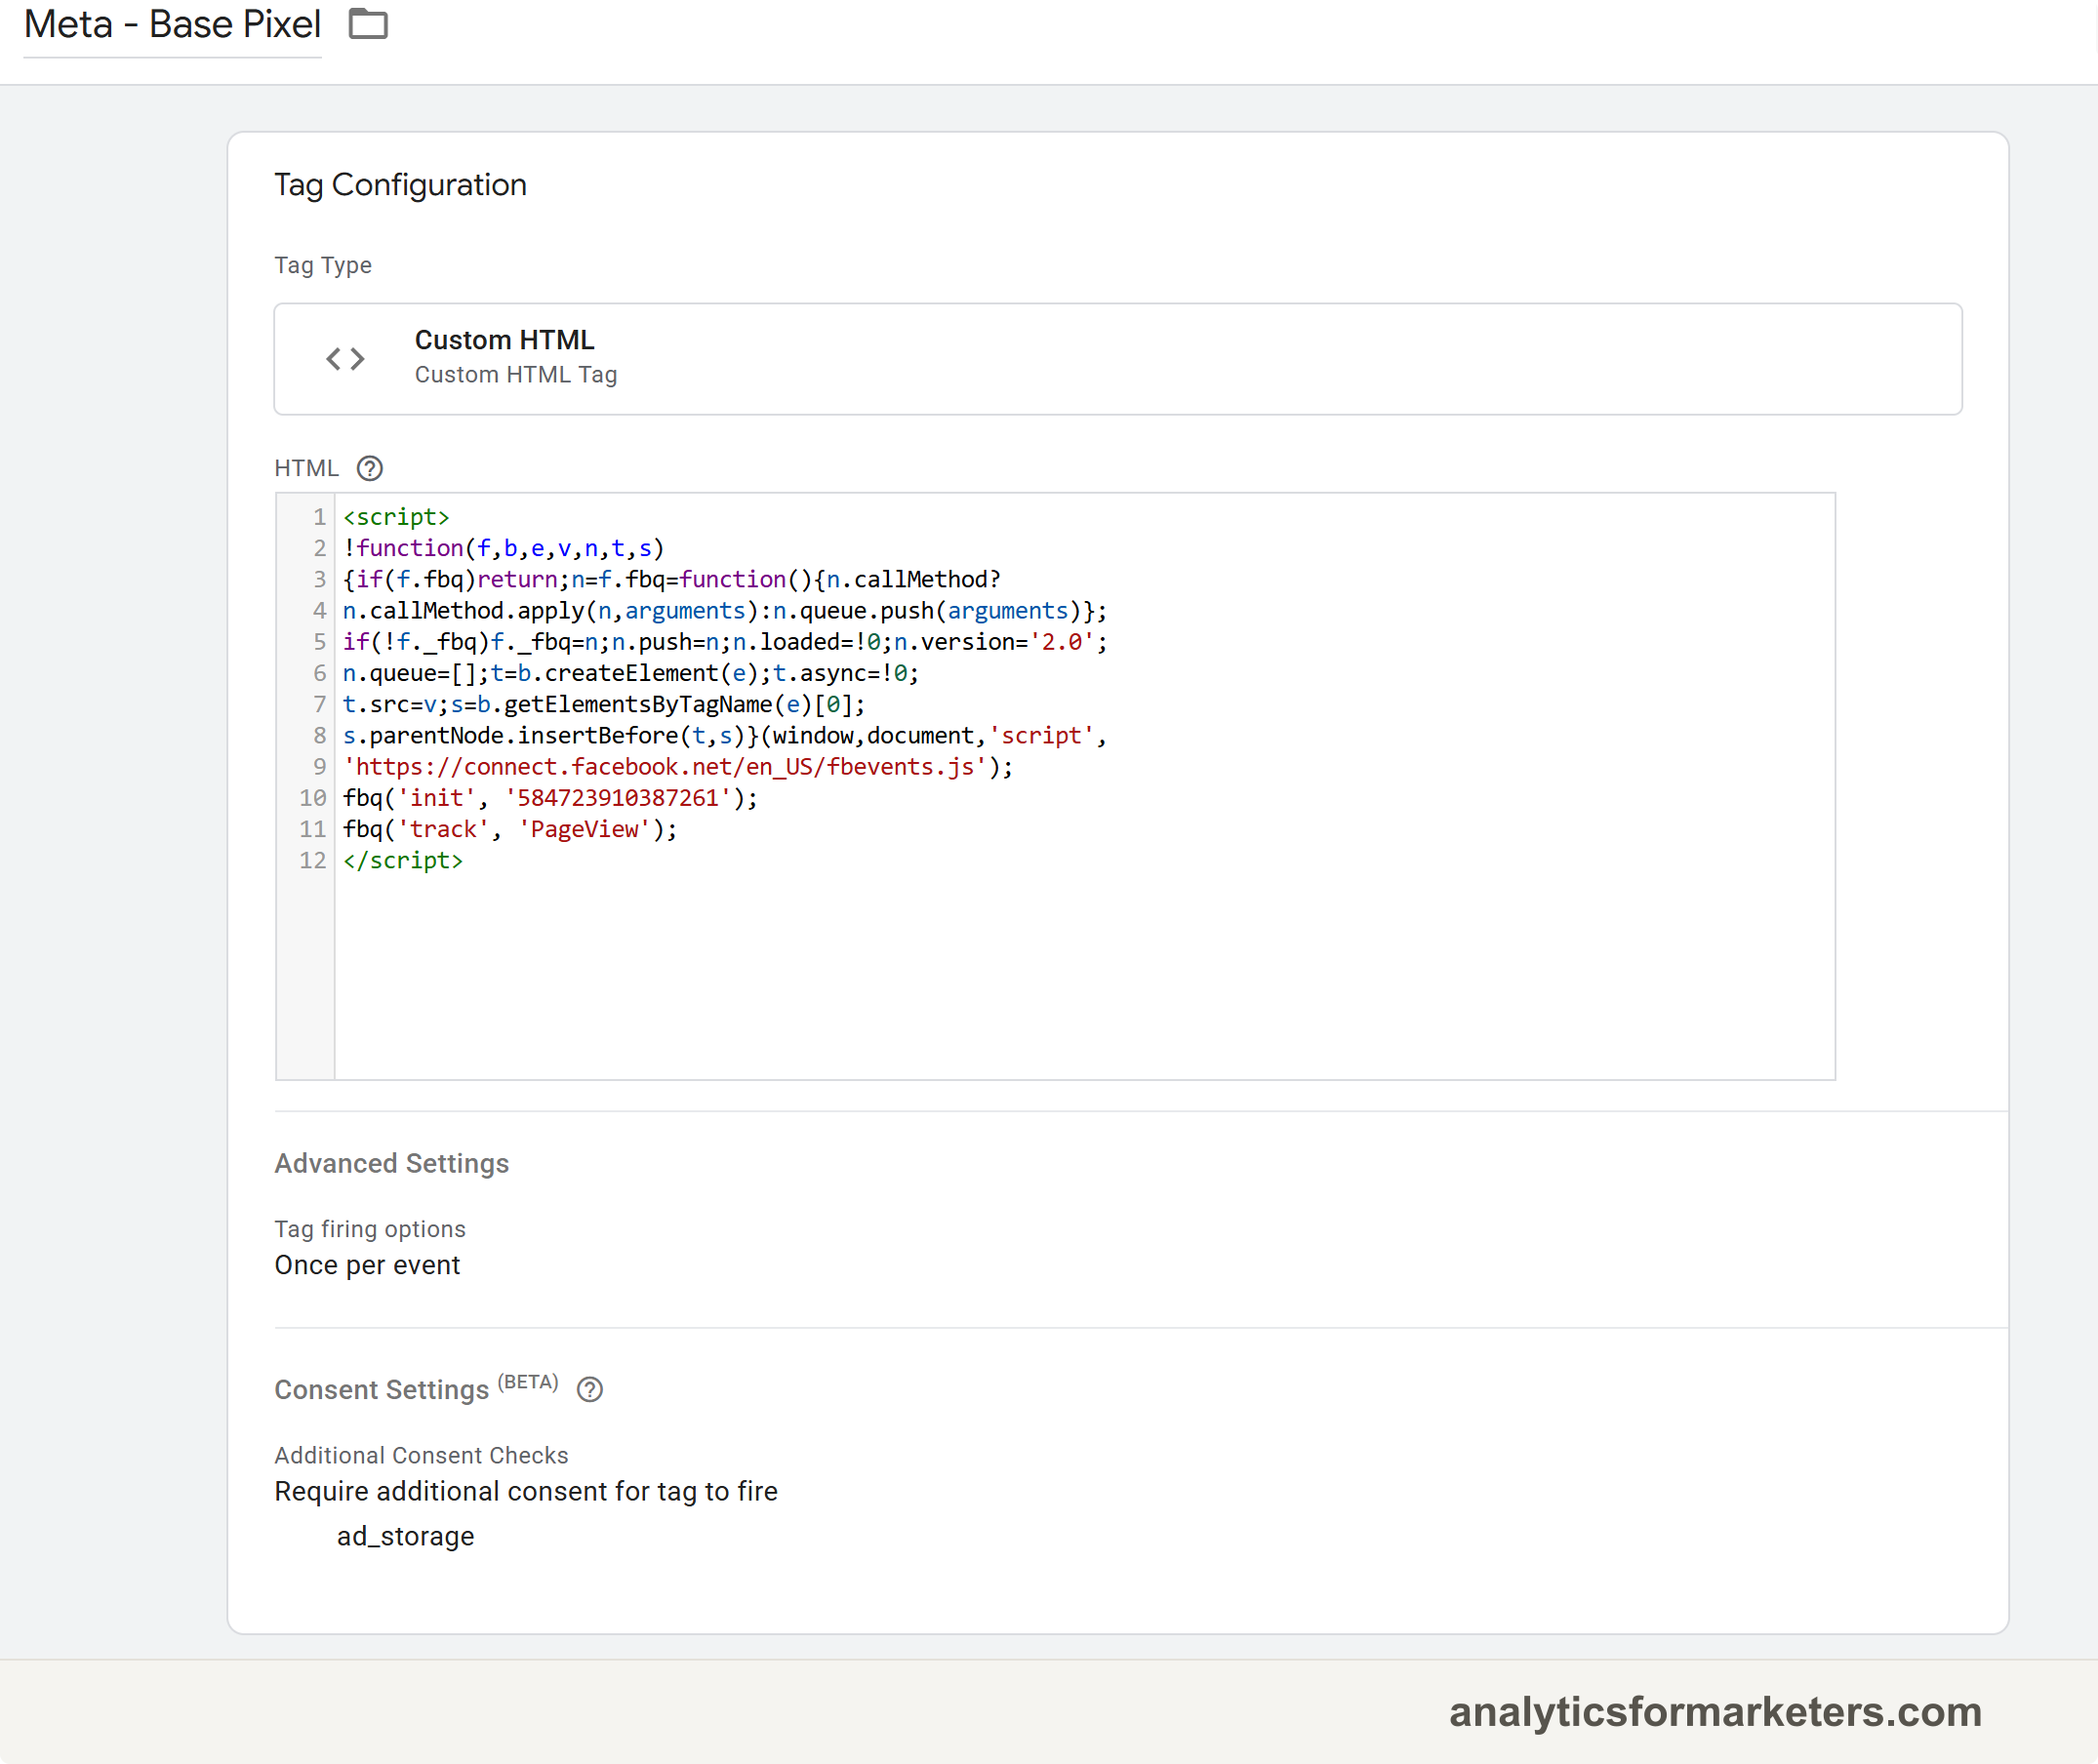
Click the Tag Configuration box and choose Custom HTML. Paste in the Meta Pixel base code below, and replace both instances of YOUR_PIXEL_ID with the Pixel ID you copied in Step 1.
<script>
!function(f,b,e,v,n,t,s)
{if(f.fbq)return;n=f.fbq=function(){n.callMethod?
n.callMethod.apply(n,arguments):n.queue.push(arguments)};
if(!f._fbq)f._fbq=n;n.push=n;n.loaded=!0;n.version='2.0';
n.queue=[];t=b.createElement(e);t.async=!0;
t.src=v;s=b.getElementsByTagName(e)[0];
s.parentNode.insertBefore(t,s)}(window,document,'script',
'https://connect.facebook.net/en_US/fbevents.js');
fbq('init', 'YOUR_PIXEL_ID');
fbq('track', 'PageView');
</script>
<noscript><img height="1" width="1" style="display:none"
src="https://www.facebook.com/tr?id=YOUR_PIXEL_ID&ev=PageView&noscript=1"
/></noscript>
The ID appears twice: once in the fbq('init', ...) line and once in the noscript image URL. Both need your real Pixel ID.
Set the trigger to All Pages
Click the Triggering box and choose All Pages. This tells GTM to load the pixel on every page of your site, which is exactly what the base code needs. Click Save.
the tag “Meta Pixel - Base Code” listed in your GTM workspace with All Pages shown in its Firing Triggers column.
If your site already has the pixel code pasted into its theme or a plugin, remove it before publishing this tag. Running the pixel twice sends duplicate events, which inflates your numbers and confuses Meta’s reporting.
Step 3: Add standard events (optional but recommended)
The base code only tracks PageView: someone loaded a page. Standard events tell Meta about specific actions with names it already understands, like ViewContent, AddToCart, Purchase, Lead, and CompleteRegistration.
Let’s add a Lead event that fires when someone lands on your thank-you page after submitting a form. This is the most common first conversion event for non-ecommerce sites.
Create a thank-you page trigger
In GTM, go to Triggers > New. Name it “Page View - Thank You Page”. Choose Page View as the trigger type, select Some Page Views, and set the condition to Page Path contains /thank-you (swap in your actual thank-you page path). Click Save.
Create the Lead event tag
Go to Tags > New and name it “Meta Pixel - Lead”. Choose Custom HTML again and paste this code:
<script>
fbq('track', 'Lead');
</script>
For the trigger, pick the “Page View - Thank You Page” trigger you made a moment ago. Click Save.
This tag is short because it calls fbq, the function your base code tag creates. GTM doesn’t promise a firing order between tags on the same trigger, and if this tag fires before the base code, the event is lost. Open the Lead tag’s Advanced Settings > Tag Sequencing and set the Meta Pixel base code tag to fire before it.
two Meta Pixel tags in your GTM workspace: the base code firing on All Pages, and the Lead event firing on the thank-you page.
Step 4: Test with Meta Pixel Helper
Before publishing, confirm the pixel actually fires. The Meta Pixel Helper is Meta’s free Chrome extension that shows which pixels are on any page you visit, though current versions ask you to sign in with a Facebook account. Search “Meta Pixel Helper” in the Chrome Web Store and confirm the developer listed is Meta before you install, because copycat extensions rank in the same results.
Open GTM Preview mode
In GTM, click Preview in the top right and enter your website URL. This opens your site in a new tab with your unpublished tags active, so you can test without pushing anything live.
Check the Pixel Helper
On your site’s tab, click the Meta Pixel Helper icon in your Chrome toolbar. A green checkmark with your Pixel ID and a PageView event means the base code is firing.
Then visit your thank-you page directly and check again. The Helper should now also list a Lead event.
Confirm in Test Events
Back in Events Manager, open your pixel and click the Test Events tab. Enter your website URL and click Open Website. As you browse, events appear in the Test Events feed within a few seconds.
a green checkmark in the Pixel Helper, and your PageView (and Lead) events appearing in the Test Events feed.
Step 5: Publish your GTM changes
Everything so far lives in a
GTM draft. Nothing reaches real visitors until you publish.
Click Submit in the top right of GTM, name the version “Added Meta Pixel”, and click Publish.
a new version listed in your GTM container with that name. Your pixel is now live for every visitor.
Step 6: Verify in Events Manager
Give it a little traffic, then confirm real data is flowing.
Go to Events Manager and open your pixel. On the Overview tab, you should see PageView events counting up, and the pixel’s status showing Active. If you set up the Lead event, submit a test form on your live site and watch for it.
New events can take up to 20 minutes to show on the Overview tab, so don’t panic if it lags behind the Test Events feed. Once you see Active and events flowing, you’re done. This part matters: an installed pixel that nobody verified is one of the most common reasons ad accounts end up with empty conversion columns.
Common Meta Pixel events for marketers
Here are the standard events you’re most likely to use, and how to fire each one in G
TM:
| Standard event | When to use it | Trigger in GTM |
|---|---|---|
| PageView | Every page (automatic with base code) | All Pages |
| ViewContent | Product pages, key content pages | Specific page URLs |
| Lead | Form submissions | Thank-you page or form submission trigger |
| CompleteRegistration | Account signups | Registration confirmation page |
| AddToCart | E-commerce add-to-cart | Button click or custom event |
| Purchase | Completed purchase | Order confirmation page |
Stick to these standard names instead of inventing your own. Meta builds its conversion reporting and audience tools around them, and a Purchase event does things a custom bought_stuff event never will.
Common problems and fixes
Pixel Helper shows “No Pixel Found.” This usually means the GTM tag isn’t firing. Check that your GTM container is published (not sitting in a draft), and that the pixel tag has the All Pages trigger attached. Use GTM Preview mode to watch the tag fire in real time.
The pixel fires but Events Manager says “No Activity Yet.” Events Manager can take up to 20 minutes to show new events. If it’s been longer, compare the Pixel ID in your GTM tag against the ID in Events Manager. A single wrong digit sends your data to a pixel that doesn’t exist.
Standard events aren’t tracking. If the base pixel works but your Lead or Purchase events don’t fire, the trigger is the usual suspect. The page URL condition must match what’s actually in the address bar, including trailing slashes and capitalization. “/thank-you/” and “/Thank-You” are different strings to GTM.
iOS 14 and ad blockers eat some of your data. A meaningful share of visitors use ad blockers or iOS tracking restrictions that stop the pixel from firing at all. This is normal, and every advertiser deals with it. When your ad spend grows, set up the Conversions API (Meta’s server-side tracking) as a supplement so more of your conversions get counted.
What to do next
Your pixel is live and reporting. From here:
- Add more standard events from the table above as your site grows. Purchase and CompleteRegistration follow the same pattern as the Lead event.
- Build a retargeting audience in Meta Ads Manager from your pixel’s website visitors. It fills up on its own from today forward.
- Connect the rest of your tracking. The pixel covers Meta; for the full picture of ad clicks to revenue across every platform, read how conversion tracking works.