Create a free account at tagmanager.google.com, then copy the two code snippets from Admin > Container > Install Google Tag Manager into your site: the first goes high in the head section, the second right after the opening body tag. Your container ID looks like GTM-XXXXXXX, and the whole setup takes about 10 minutes.
By the end of this tutorial, you’ll have Google Tag Manager installed on your website and ready to manage all your tracking codes from one place. The setup takes about 10 minutes. The GTM side is identical on every platform; the only thing that changes is where you paste the code, whether you’re on WordPress, Shopify, Squarespace, or a hand-coded site.
What is Google Tag Manager (and why use it)?
Google Tag Manager (GTM) is a free tool that lets you add and manage tracking codes on your website without editing your site’s code every time. Those tracking codes are called tags. Here’s what that means: a tag is a small piece of code that sends data to a tool like Google Analytics, Google Ads, or Meta.
In plain English: instead of pasting a new tracking code into your site’s HTML every time you want to measure something, you install Google Tag Manager once. From then on, you add, edit, and remove tags from GTM’s web interface. No developer required for most changes.
GTM and Google Analytics do different jobs, and mixing them up is the most common point of confusion. GA4 collects and reports your data. GTM is the delivery system that puts GA4 (and any other tracking tool) on your site. If you’re new to analytics in general, start with our GA4 beginner’s guide. And once you finish the install below, our Google Tag Manager tutorial explains tags, triggers, and variables in depth.
Before you start
Three things: a Google account, admin access to your website (or the ability to edit its code), and about 10 minutes.
Already have GA4 installed directly on your site? That’s fine, and you don’t need to undo anything today. Follow our Google Analytics installation guide if you’re not sure how it was set up. You can move that setup into GTM later; we cover the handoff at the end of this tutorial.
Step 1: Create your GTM account and container
Open Tag Manager
Go to tagmanager.google.com and sign in with your Google account. Click Create Account.
Fill in the setup form
GTM asks for a few details:
- Account Name: your company name (for example, “Acme Coffee”).
- Container Name: your website URL (for example, “acmecoffee.com”). A container is the bucket that holds every tag for one website.
- Target platform: choose Web.
Create and accept the terms
Click Create. GTM shows its Terms of Service; review and accept them to continue.
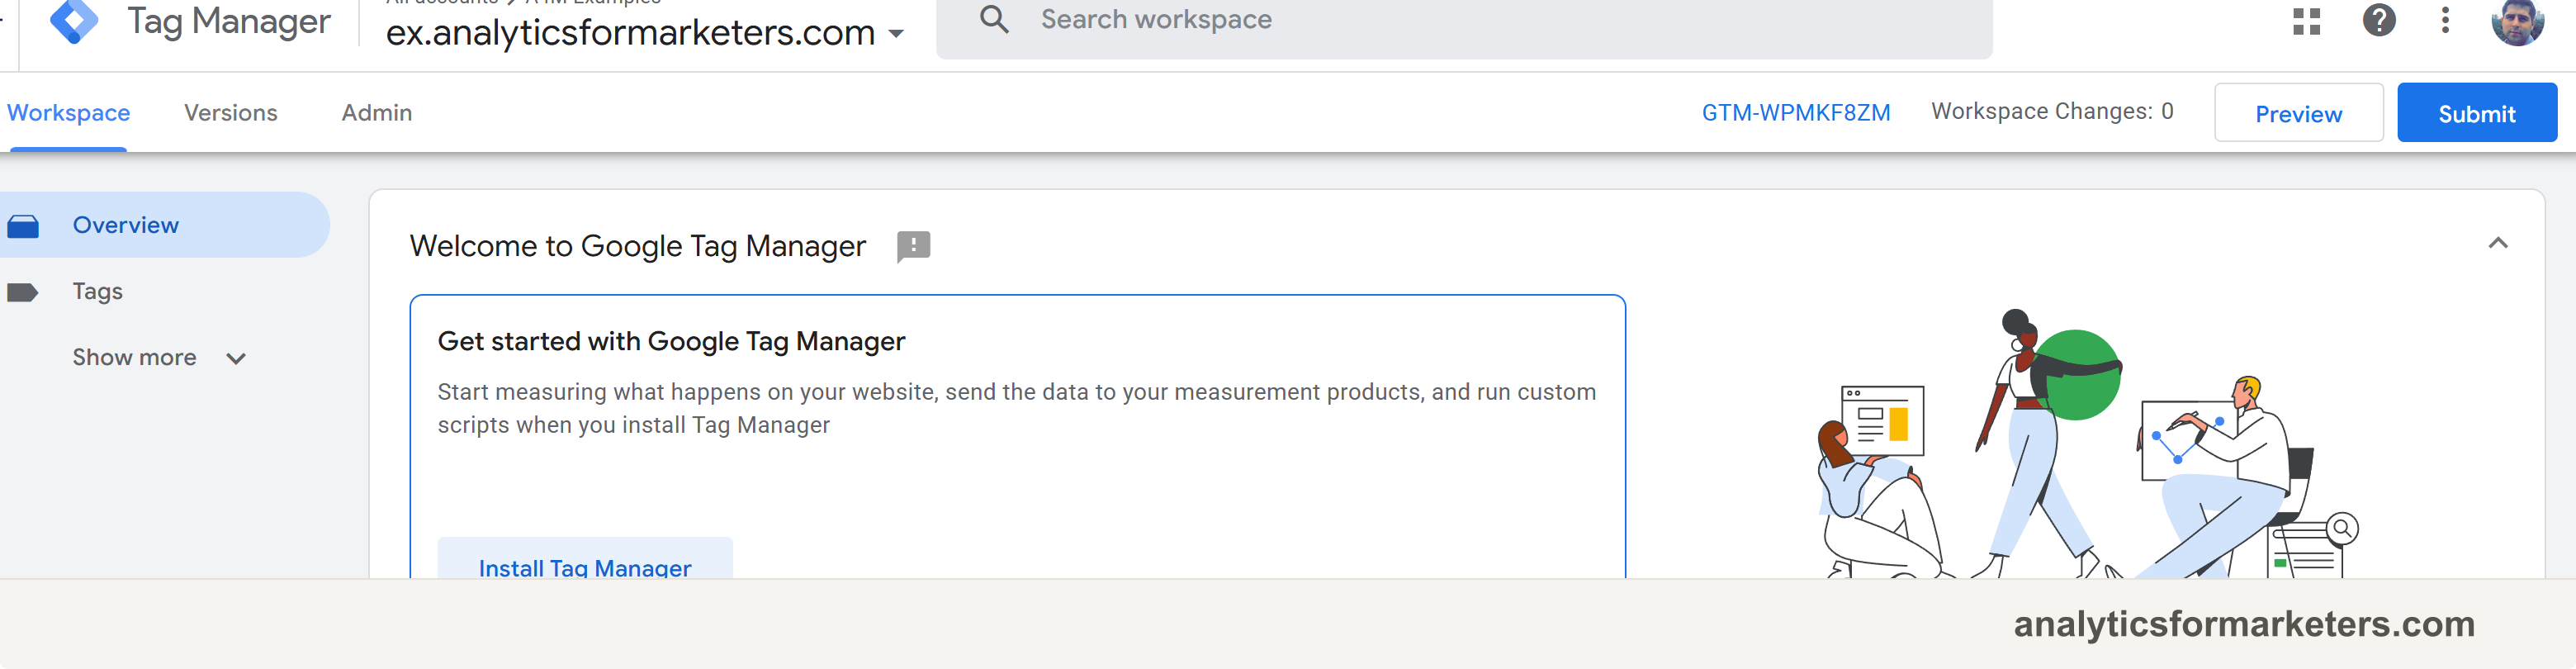
the GTM workspace for your new container, with your container ID in the top bar. It follows this format:
GTM-5FJ2K8QEvery container gets an ID that starts with GTM- followed by letters and numbers. You’ll paste this ID into plugins and platform settings, so keep it handy.
Step 2: Get the GTM code snippets
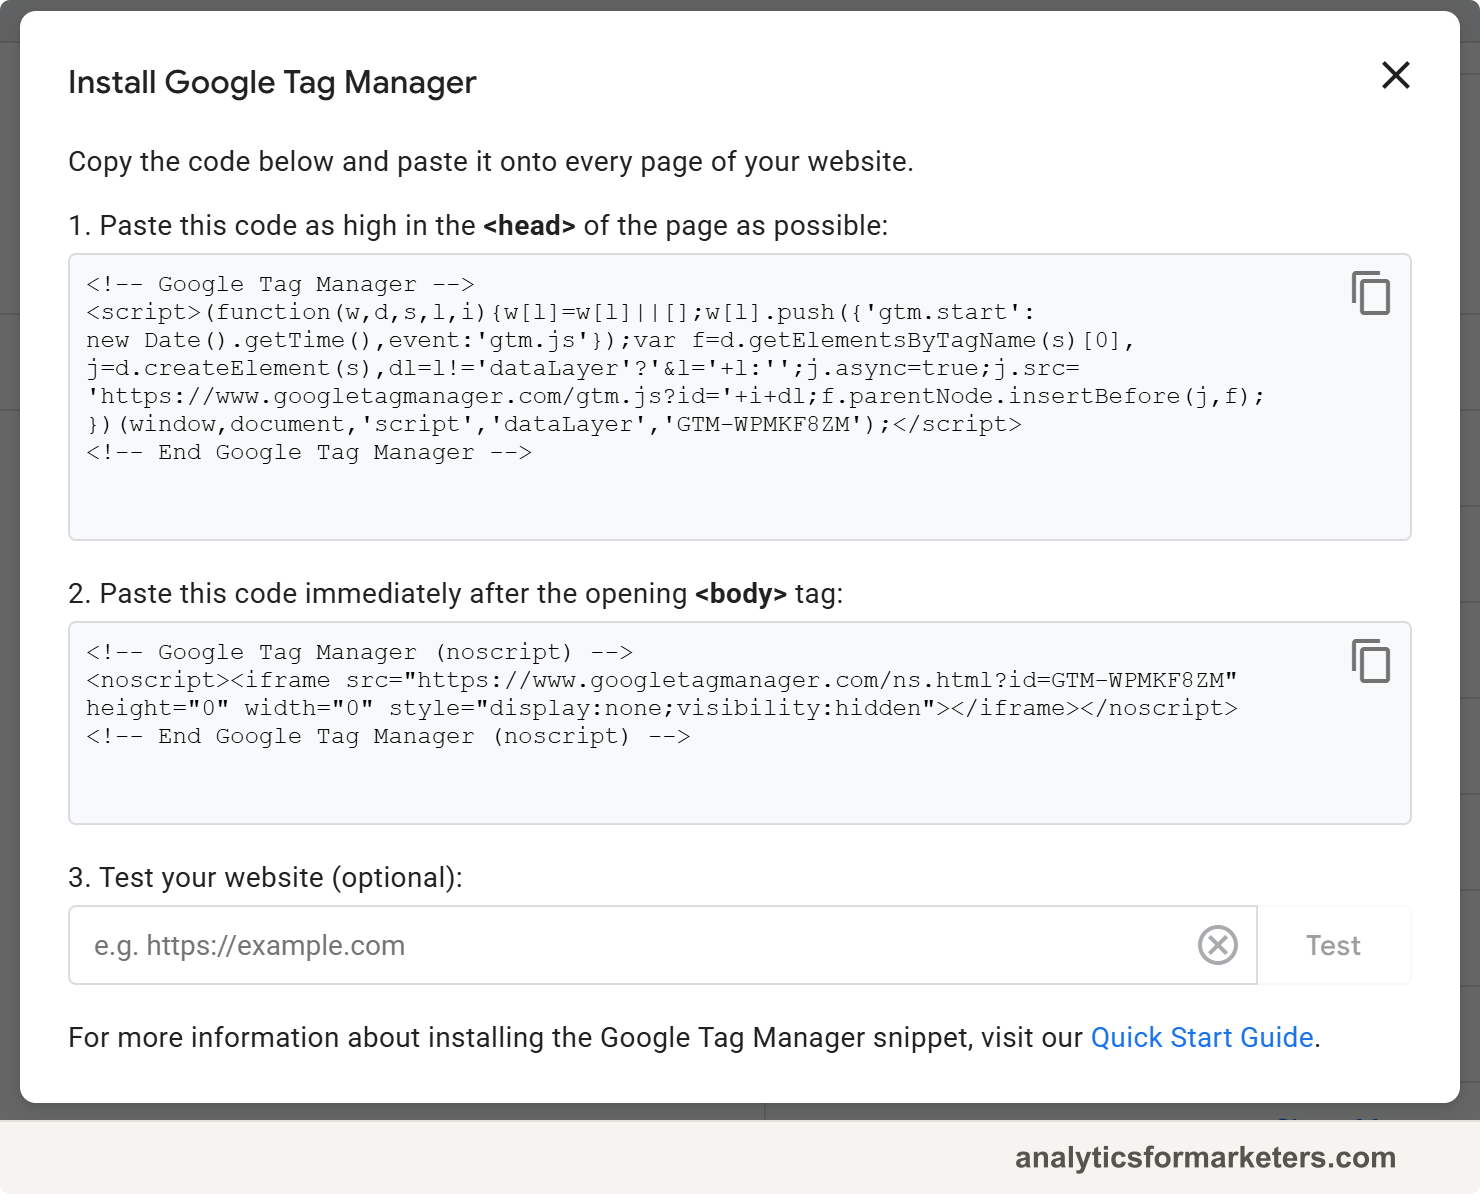
Right after you create the container, GTM opens a popup with two code snippets. If you closed it, click your container ID in the top bar, or find it any time here:
Admin Container Install Google Tag ManagerThe two snippets do different jobs:
- The first snippet goes as high in the
<head>section of every page as you can place it. This is the code that loads GTM. - The second snippet goes right after the opening
<body>tag. It’s a fallback (a<noscript>iframe) that keeps GTM working for the rare visitor whose browser has JavaScript turned off.
Here’s what they look like, with GTM-XXXXXXX standing in for your real container ID:
<!-- Google Tag Manager -->
<script>(function(w,d,s,l,i){w[l]=w[l]||[];w[l].push({'gtm.start':
new Date().getTime(),event:'gtm.js'});var f=d.getElementsByTagName(s)[0],
j=d.createElement(s),dl=l!='dataLayer'?'&l='+l:'';j.async=true;j.src=
'https://www.googletagmanager.com/gtm.js?id='+i+dl;f.parentNode.insertBefore(j,f);
})(window,document,'script','dataLayer','GTM-XXXXXXX');</script>
<!-- End Google Tag Manager --><!-- Google Tag Manager (noscript) -->
<noscript><iframe src="https://www.googletagmanager.com/ns.html?id=GTM-XXXXXXX"
height="0" width="0" style="display:none;visibility:hidden"></iframe></noscript>
<!-- End Google Tag Manager (noscript) -->Put each snippet where it belongs: the first in <head>, the second right after the opening <body> tag. If they’re swapped, GTM loads late or unreliably instead of as soon as the page starts loading. Copy each one from GTM (not from this page) so it carries your real container ID.
Google’s own Install a web container guide covers edge cases like server-side setups if you need them later.
Step 3: Install the code on your platform
How you add those snippets depends on where your site lives:
| Platform | Installation method | Time |
|---|---|---|
| WordPress | GTM4WP plugin or manual code | 5 min |
| Shopify | Edit theme.liquid | 5 min |
| Squarespace | Code Injection settings | 3 min |
| Custom HTML | Paste into template | 2 min |
WordPress
Option A: use a plugin (recommended). The GTM4WP plugin places both snippets for you.
- Go to Plugins > Add New Plugin and search for “GTM4WP”. The plugin you want is by Thomas Geiger.
- Click Install Now, then Activate.
- Go to Settings > Google Tag Manager.
- Paste your container ID (the
GTM-XXXXXXXvalue) into the Google Tag Manager ID field. - Leave the container code placement setting at its default and click Save Changes.
Site Kit by Google works too. It connects to your Google account and sets up Tag Manager without any pasting, though it gives you fewer placement controls than GTM4WP.
Option B: paste the code manually. A code-snippet plugin like WPCode (formerly Insert Headers and Footers) gives you a header box for snippet 1 and a body box for snippet 2. You can also edit your theme’s header.php directly, but a plugin survives theme updates; direct edits don’t unless you use a child theme (a safe copy of your theme that survives updates).
Both routes are covered step by step, with verification, in the full guide to installing GTM on WordPress.
Shopify
- From your Shopify admin, go to Online Store > Themes.
- On your current theme, click the three-dot menu > Edit code.
- Open theme.liquid in the Layout folder.
- Paste snippet 1 right after the opening
<head>tag, so it sits as high in the head as possible. - Paste snippet 2 right after the opening
<body>tag. - Click Save.
One note: code in theme.liquid doesn’t run on Shopify’s checkout pages. Tracking checkout requires a custom pixel set up through customer events, which is beyond this tutorial. The full walkthrough, including when GTM is the wrong tool for a Shopify store, is in our guide to installing GTM on Shopify.
Squarespace
Code Injection requires a plan that includes it: the current Core, Plus, or Advanced plans, or the legacy Business and Commerce plans. The current Basic plan and the legacy Personal plan don’t have it.
- Click Website, scroll to the bottom of the Pages panel, and open Code Injection under Website Tools (labeled Custom Code on some sites; older dashboards show Settings > Advanced > Code Injection).
- Paste snippet 1 into the Header box.
- Paste snippet 2 into the Footer box.
One thing to know: Squarespace doesn’t let you place code right after the opening <body> tag, so the Footer box is the closest available spot for snippet 2. That’s a Squarespace limitation, and it’s fine in practice. Snippet 2 is only a fallback for browsers without JavaScript. The full walkthrough with verification steps is in our guide to installing GTM on Squarespace.
Custom HTML site
Paste snippet 1 into the <head> of your page template and snippet 2 right after the opening <body> tag. If your site doesn’t use a shared template, add both snippets to every page you want to track.
Step 4: Verify GTM is installed correctly
Don’t skip this part. A broken install fails silently, and you won’t find out until weeks of data are missing.
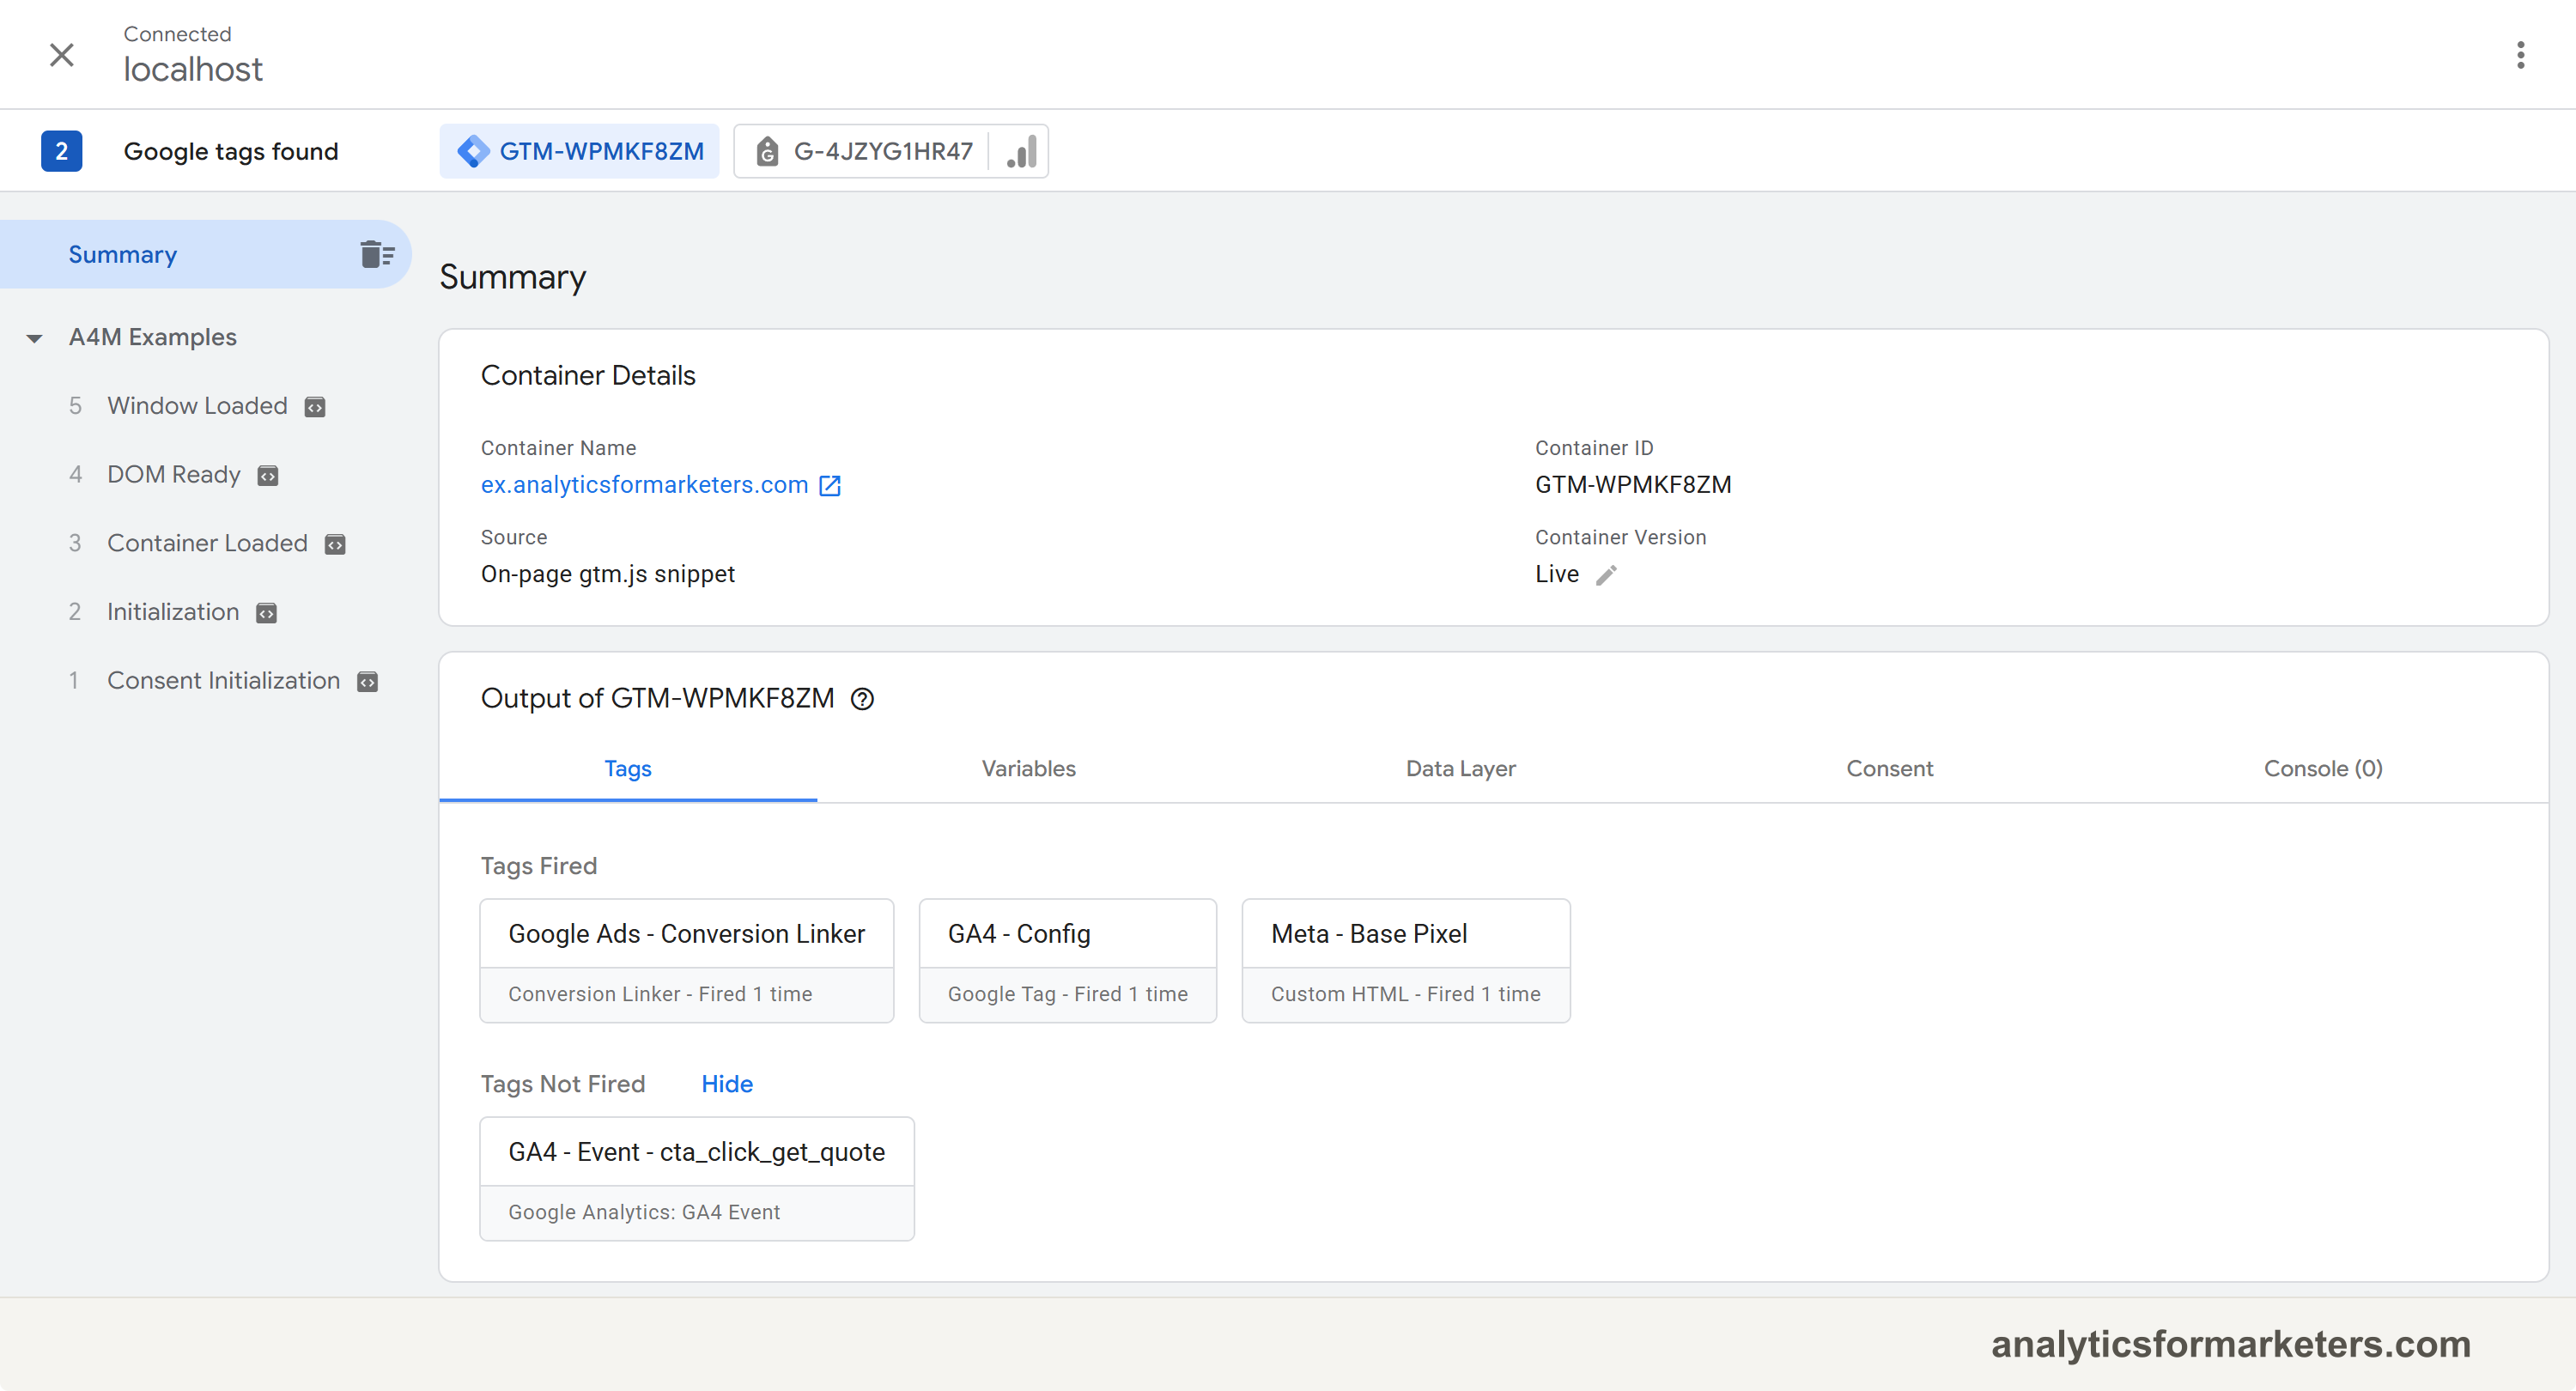
Method 1: Preview mode (the best check). In your GTM workspace, click Preview in the top right. A tool called Tag Assistant opens. Enter your website’s URL and click Connect. Your site opens in a new window with a Tag Assistant badge in the corner.
“Connected!” in the Tag Assistant tab, and a Container Loaded event in the debug pane on the left. That means GTM is live on your page.
Method 2: the Tag Assistant Chrome extension. Install the Tag Assistant Companion extension from the Chrome Web Store. It helps Preview mode connect reliably and shows which Google tags fire on any page you visit.
Method 3: check the page source. Right-click any page on your site and choose View Page Source. Press Ctrl+F (Cmd+F on Mac) and search for GTM-. Your container ID should appear twice: once for each snippet.
If none of these checks pass, jump to the troubleshooting section below.
Step 5: Publish your container
This is the step most tutorials gloss over, and it’s where most installs quietly stall. GTM uses a draft-and-publish workflow: changes you make in the workspace don’t go live until you publish them.
Click Submit
In the top right of your workspace, click Submit.
Name the version
Give the version a name like “Initial setup”. A short description helps future-you remember what changed.
Publish
Click Publish in the top right.
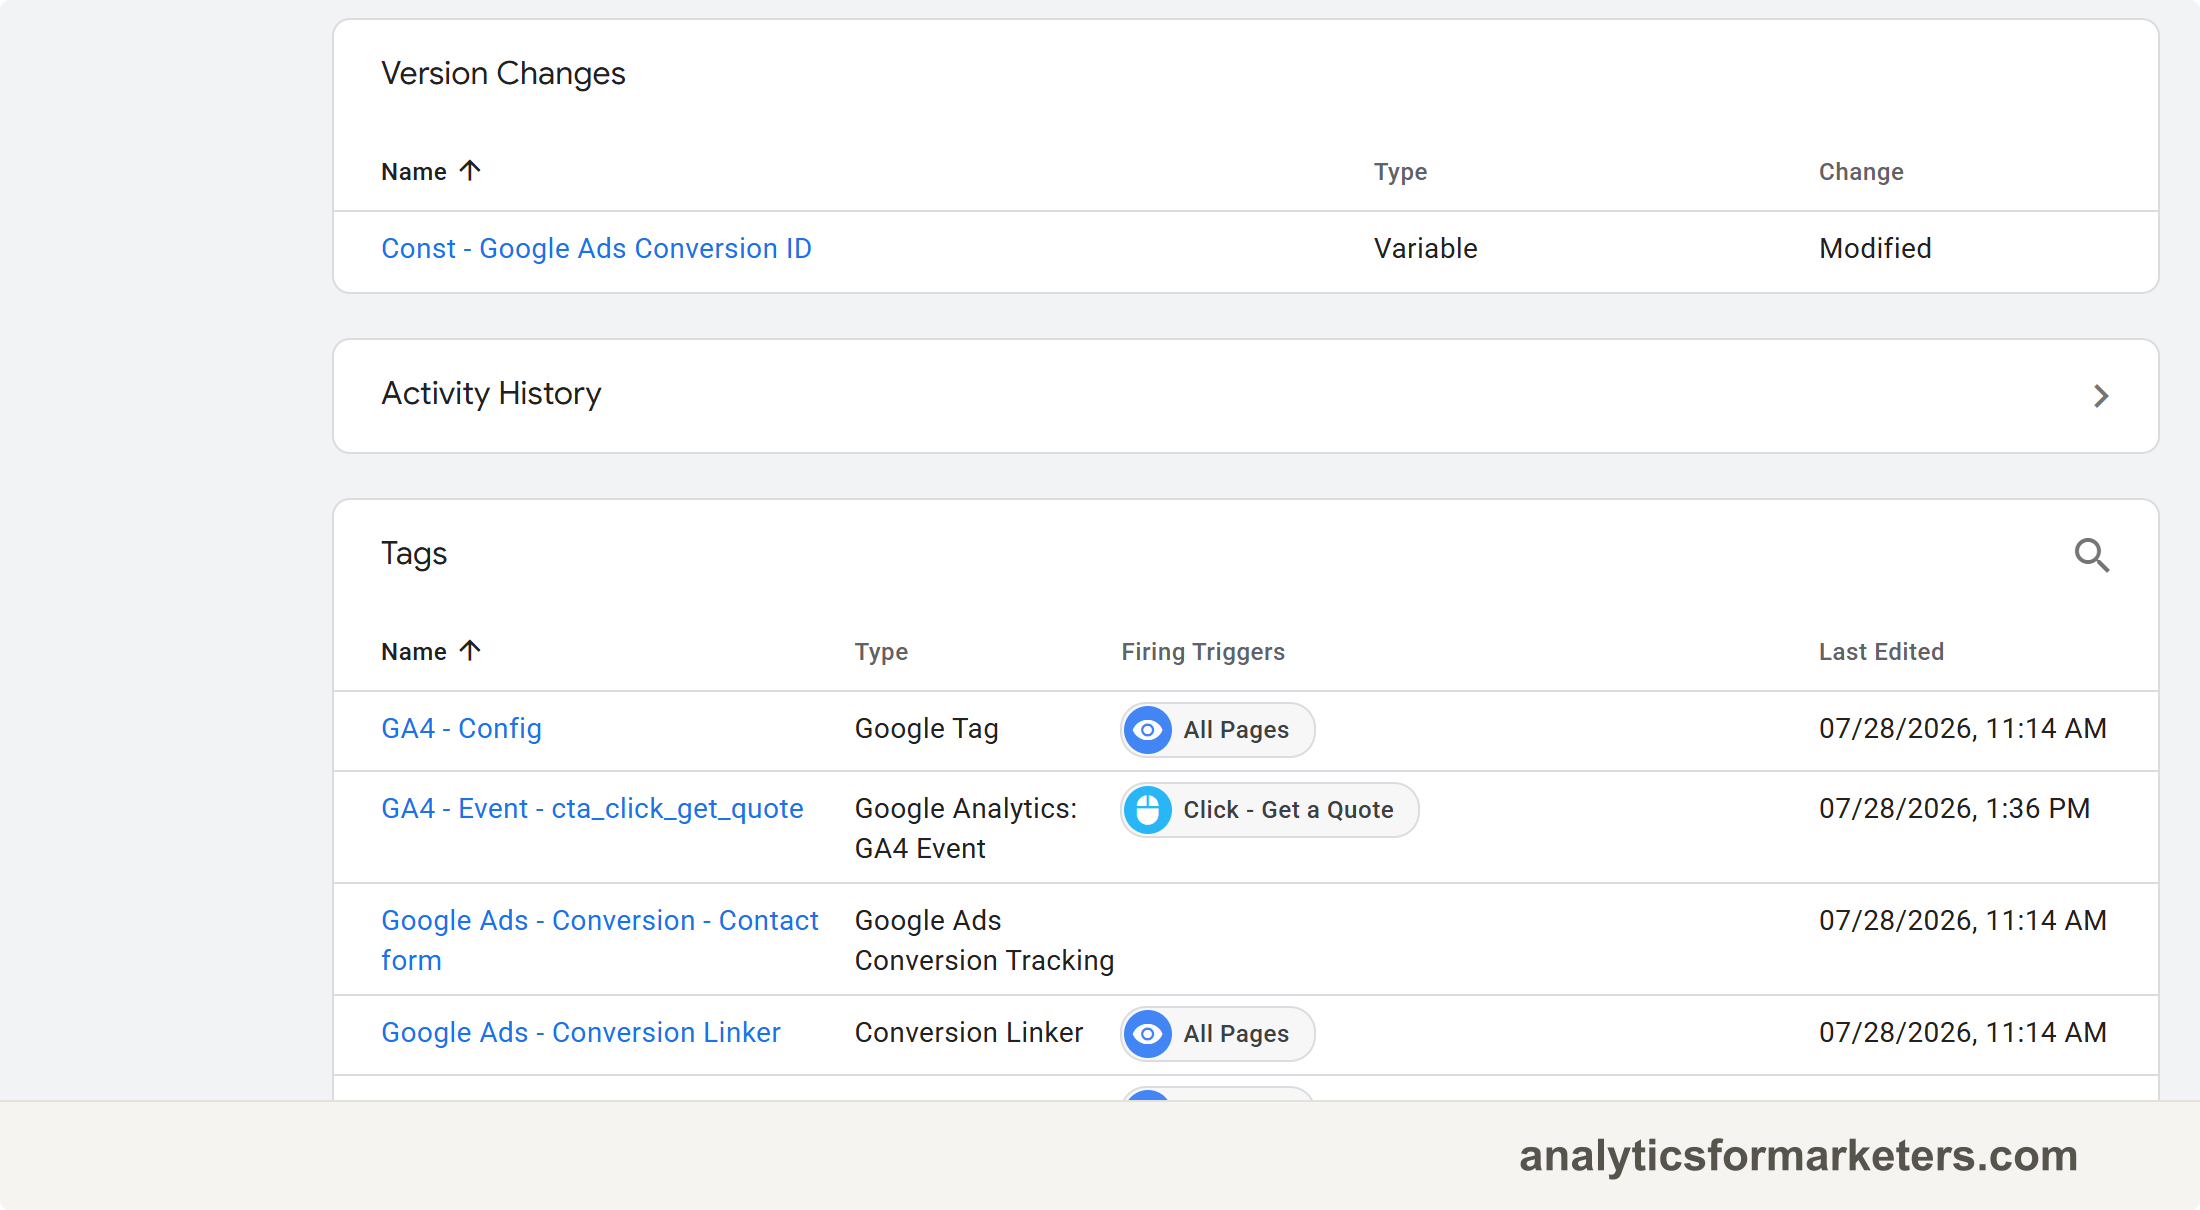
a summary screen for Version 1. Open the Versions tab at the top of GTM and you’ll see it listed in your container’s version history.
Troubleshooting: GTM installed but not working?
These four mistakes cause almost every failed GTM install.
1. The code is in the wrong place. Snippet 1 must be in <head>, not <body>. Snippet 2 goes right after the opening <body> tag. If they’re swapped or both sitting in the footer, GTM loads late or not at all. Re-check placement against Step 2.
2. You never published. Installing the code on your site is only half the job. Until you click Submit > Publish in GTM, no tags fire. Many people install GTM, add tags, and wonder why nothing tracks: the container is still in draft. Check your Versions tab; if it’s empty, that’s the problem.
3. A caching plugin is serving old pages. On WordPress, plugins like WP Super Cache and W3 Total Cache keep copies of your pages from before you added GTM. Clear the cache after installing, then re-run the page source check.
4. GA4 is installed twice. If you previously added the GA4 tag directly to your site and later add GA4 through GTM as well, every visitor gets counted twice and your traffic numbers double overnight. When you move GA4 into GTM, remove the direct GA4 code from your site.
What to do next
Your GTM container is installed, verified, and published. Right now it’s also empty: it isn’t tracking anything yet. A container with no tags is like wiring with nothing plugged in.
Your first tag should almost certainly be Google Analytics. Our guide to adding GA4 through Google Tag Manager walks you through it, including how to retire a direct GA4 install without double-counting.
From there, work through the Google Tag Manager tutorial to learn triggers and variables, the two building blocks behind tracking button clicks, form submissions, and everything else your boss will eventually ask about.