To track button clicks with Google Tag Manager, enable the built-in click variables in Variables > Configure, create a Click - All Elements trigger filtered to your button's Click Text or Click ID, then attach it to a Google Analytics: GA4 Event tag. Verify the setup in Preview mode and GA4's Realtime report, where the event appears within seconds.
By the end of this tutorial, you’ll have Google Tag Manager tracking specific button clicks on your website, so you can see in GA4 exactly which CTAs, links, and buttons people click.
No code required. You’ll set up one trigger and one tag, test both, and publish. Plan for 15 to 20 minutes.
Why track button clicks?
GA4 tracks page views automatically, but it doesn’t tell you which buttons people click on a page.
Say your page has a “Get a Quote” button, a “Learn More” link, and a phone number. Which one do people actually use? Page view data can’t answer that. Button click tracking can.
Common things marketers track this way:
- CTA buttons (“Get a Quote”, “Start Free Trial”, “Request Demo”)
- Pricing page buttons
- Phone number clicks
- Download links
- Navigation menu clicks
Before you start
Three prerequisites, each with its own guide if you need it:
- GTM is installed on your site. If not, follow the guide to install Google Tag Manager first.
- GA4 runs through GTM. Your GA4 tag should live inside your container. Here’s how to add Google Analytics through Tag Manager.
- You know what tags, triggers, and variables are. The short version: a tag is an instruction GTM runs (like “send an event to GA4”), a trigger is the rule for when it runs, and a variable is a piece of information GTM can read (like the text on whatever got clicked). For the full picture, start with the Google Tag Manager tutorial.
You’ll need publish rights in your GTM container to push these changes live. If an agency or developer manages your container, you can still build and test everything in Preview mode, then hand off the publish step.
Set up click tracking in six steps
Enable built-in click variables in GTM
In your GTM workspace, click Variables in the left menu, then click Configure in the Built-In Variables section.
Workspace Variables ConfigureA panel opens with a long list of checkboxes. Scroll to the Clicks section and check all six:
- Click Element
- Click Classes
- Click ID
- Click Target
- Click URL
- Click Text
These are GTM’s built-in click variables: pre-made variables that capture information about whatever someone clicks on your page. (Click Target captures the link’s target attribute, like _blank. You won’t use it often, but checking everything is the simplest path.) GTM ships with them turned off, which is why this step comes first. Without it, every click variable stays empty.
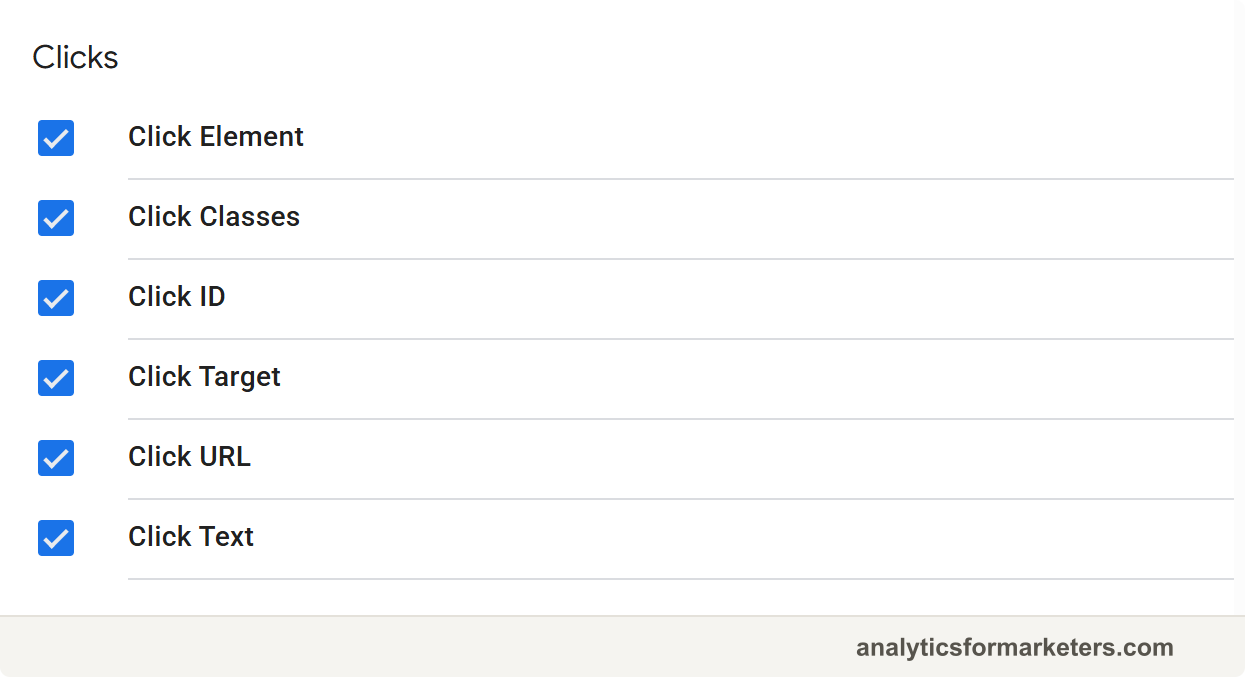
Close the panel. You should see the click variables listed in your Built-In Variables table.
Identify your button
Before you can tell GTM “track this button,” you need to know what makes that button unique. Preview mode shows you.
Click Preview in the top right of your workspace. A tool called Tag Assistant opens in a new tab. Here’s what that means: Tag Assistant is GTM’s testing environment, which loads your site with a debug connection so you can watch what GTM sees, without affecting real visitors.
Enter your site’s URL and click Connect. Your site opens in another tab with a “Tag Assistant Connected” badge in the corner. Go to the page with your button and click the button once.
Now switch back to the Tag Assistant tab. This is the part where most tutorials lose you, so let’s read the debug pane together.
Down the left side you’ll see a timeline of events: Container Loaded, maybe DOM Ready and Window Loaded, and near the top, a new entry called Click (or Link Click if your button is a link). That entry is your button click.
Click that Click entry, then click the Variables tab across the top of the main panel. You’ll see a table listing each variable with its current value. Find the click variables you enabled in Step 1 and note their values. For a typical CTA button:
| Click variable | What it captures | Example value |
|---|---|---|
| Click Text | The visible text on the button | ”Get a Quote” |
| Click Classes | The CSS class(es) of the element | ”btn btn-primary cta-main” |
| Click ID | The HTML ID of the element | ”quote-button” |
| Click URL | The URL the link points to | ”/contact/“ |
| Click Element | The full HTML element | <a class="btn" href="/contact/"> |
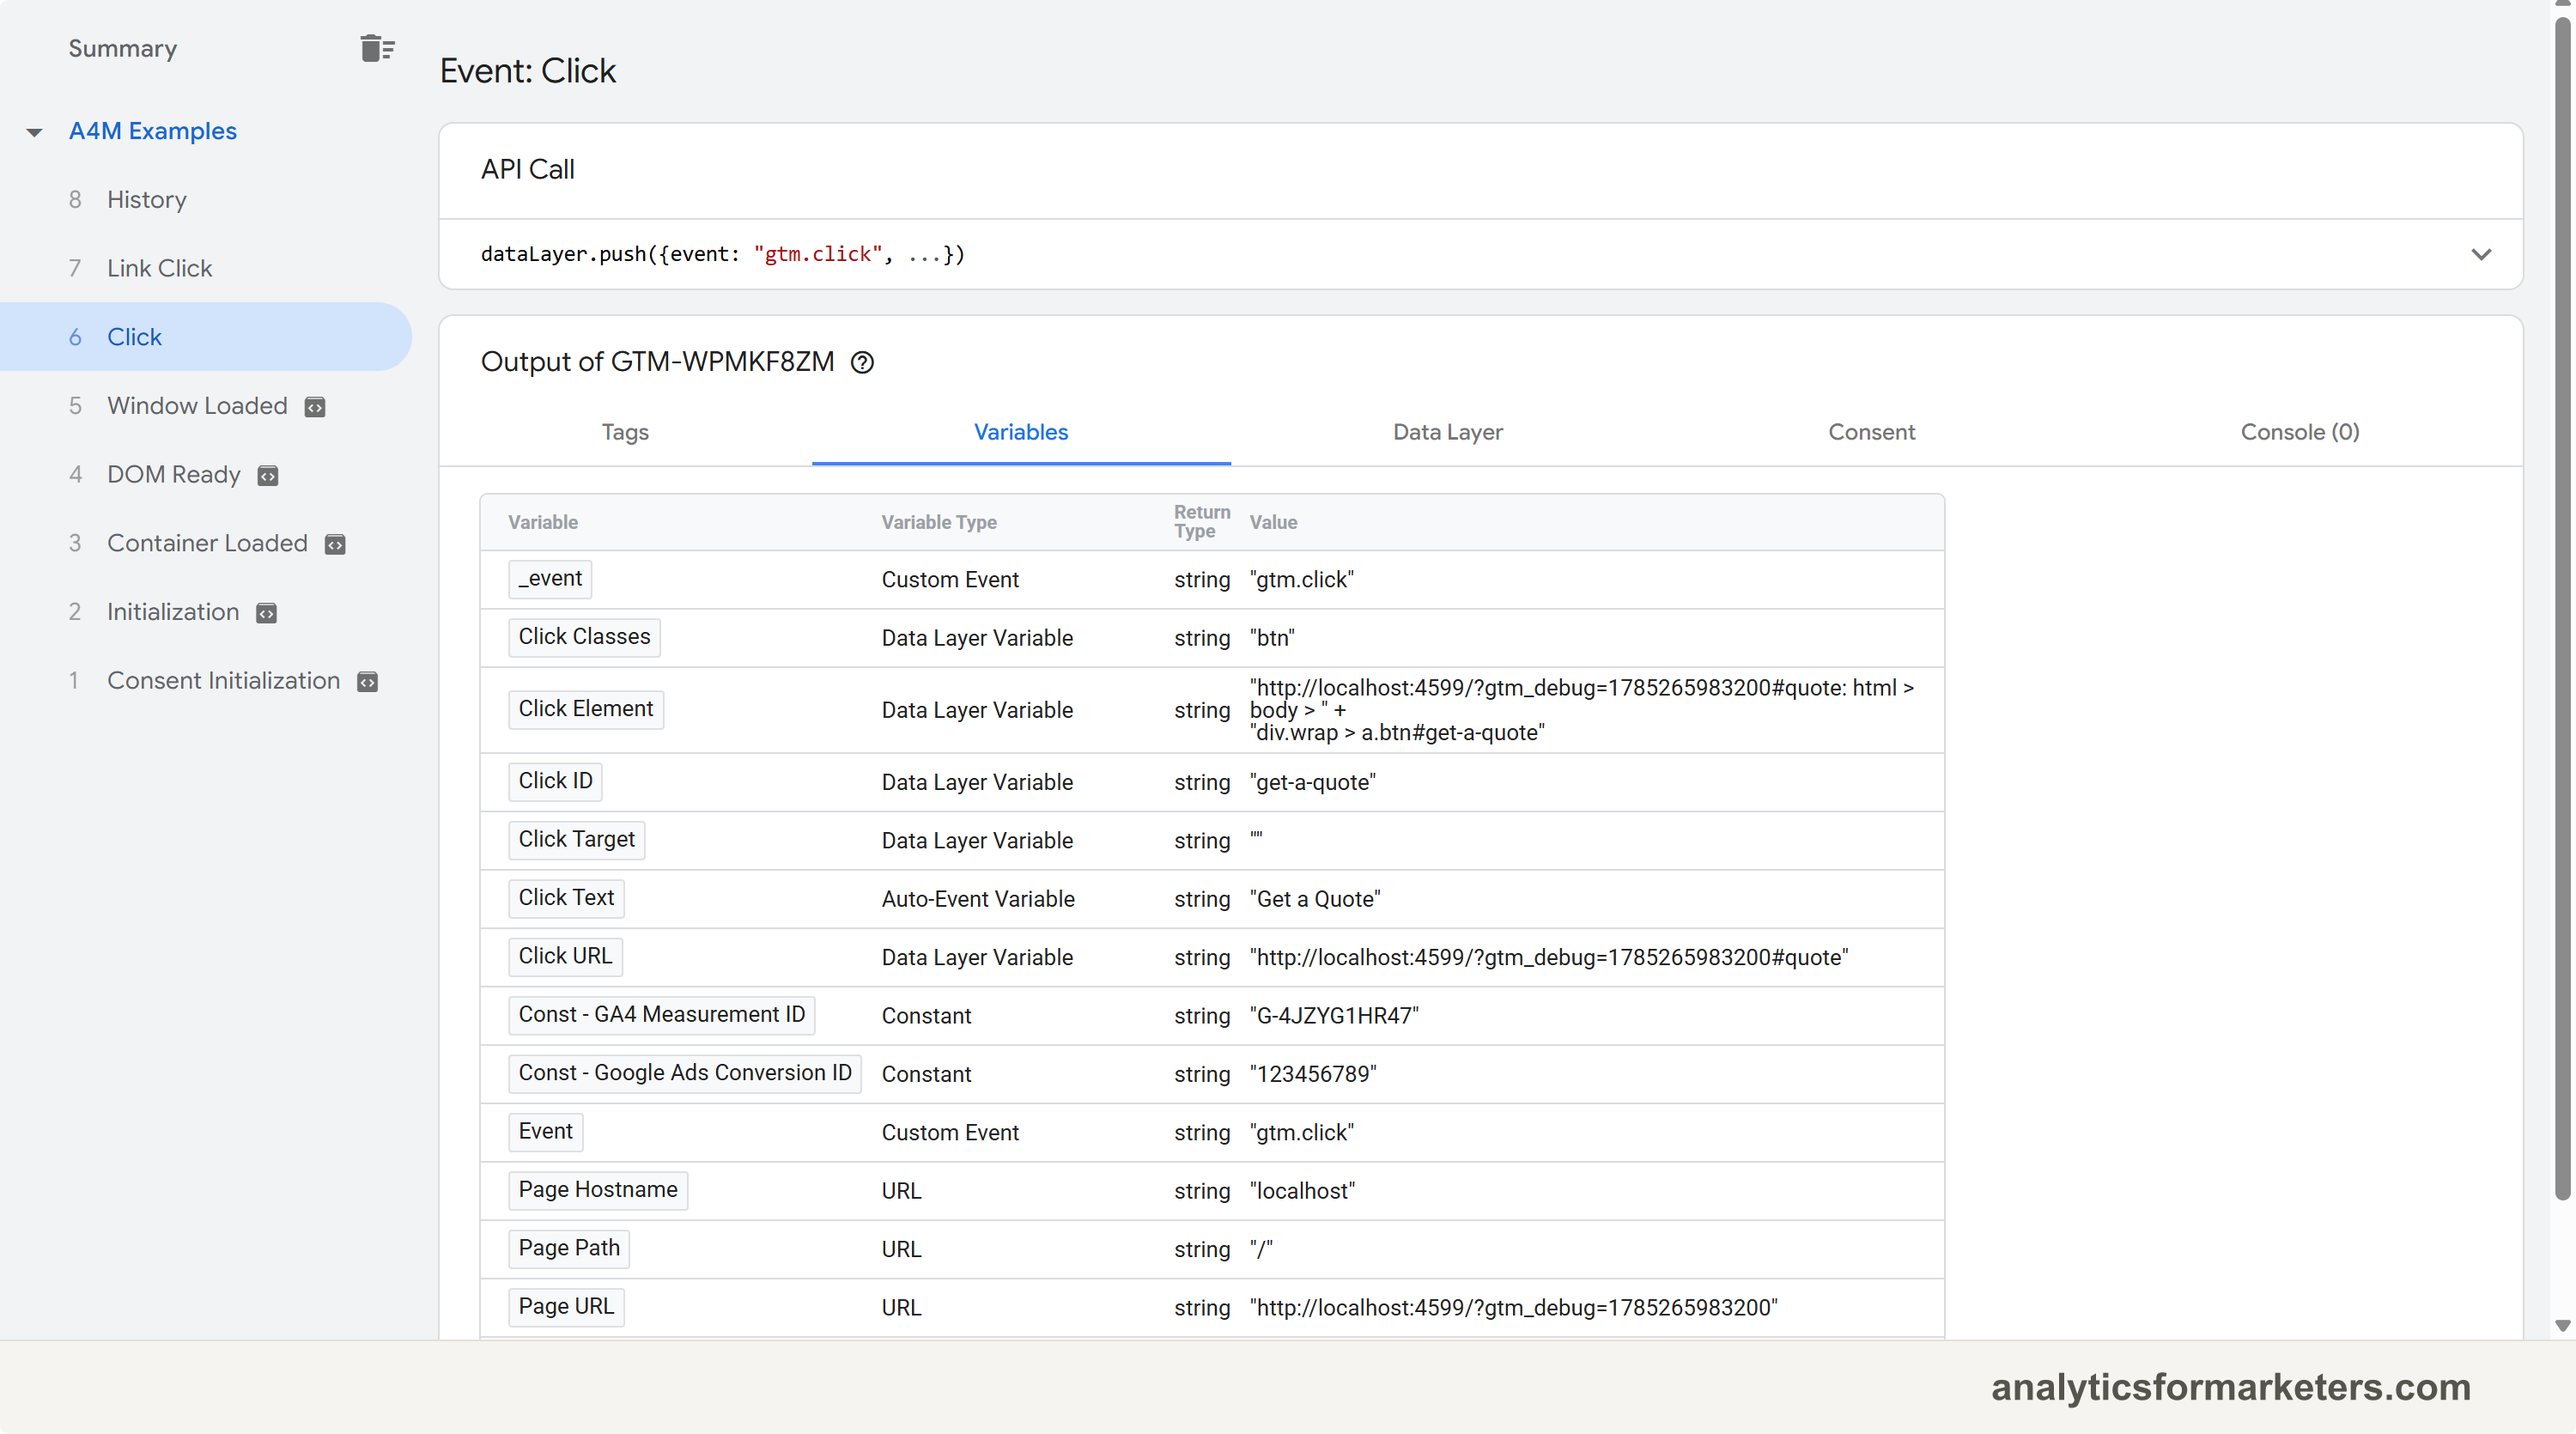
You should see real values next to the click variables. If they all show “undefined,” go back to Step 1: the built-in variables aren’t enabled.
Write down one value that uniquely identifies your button. Which one should you pick?
| Targeting method | When to use it | Condition example |
|---|---|---|
| Click Text | Button has unique visible text | Click Text contains “Get a Quote” |
| Click ID | Developer added an ID to the element | Click ID equals “quote-button” |
| Click Classes | Button has a unique CSS class | Click Classes contains “cta-main” |
| Click URL | Targeting all links to a specific page | Click URL contains “/contact” |
Click ID is the most reliable when it exists, because IDs are meant to be unique on a page. Click Text is the most common fallback and works well when no other button shares that text.
Create a click trigger
Back in your GTM workspace, click Triggers in the left menu, then New.
Workspace Triggers NewName the trigger something you’ll recognize later, like “Trigger - Get a Quote Click.” A naming pattern saves you real pain once your container holds 30 triggers.
Click the trigger configuration box and choose Click - All Elements. This trigger type fires when someone clicks anything on the page: buttons, links, images, divs. (Click - Just Links only fires on <a> link tags. All Elements is the safer default, and the FAQ below covers the difference.)
Under “This trigger fires on,” select Some Clicks. This matters: All Clicks would fire your tag on every single click anywhere on your site.
Now set the condition using the value you noted in Step 2:
Click Text > contains > “Get a Quote”
Or, if you’re using an ID: Click ID > equals > “quote-button”.
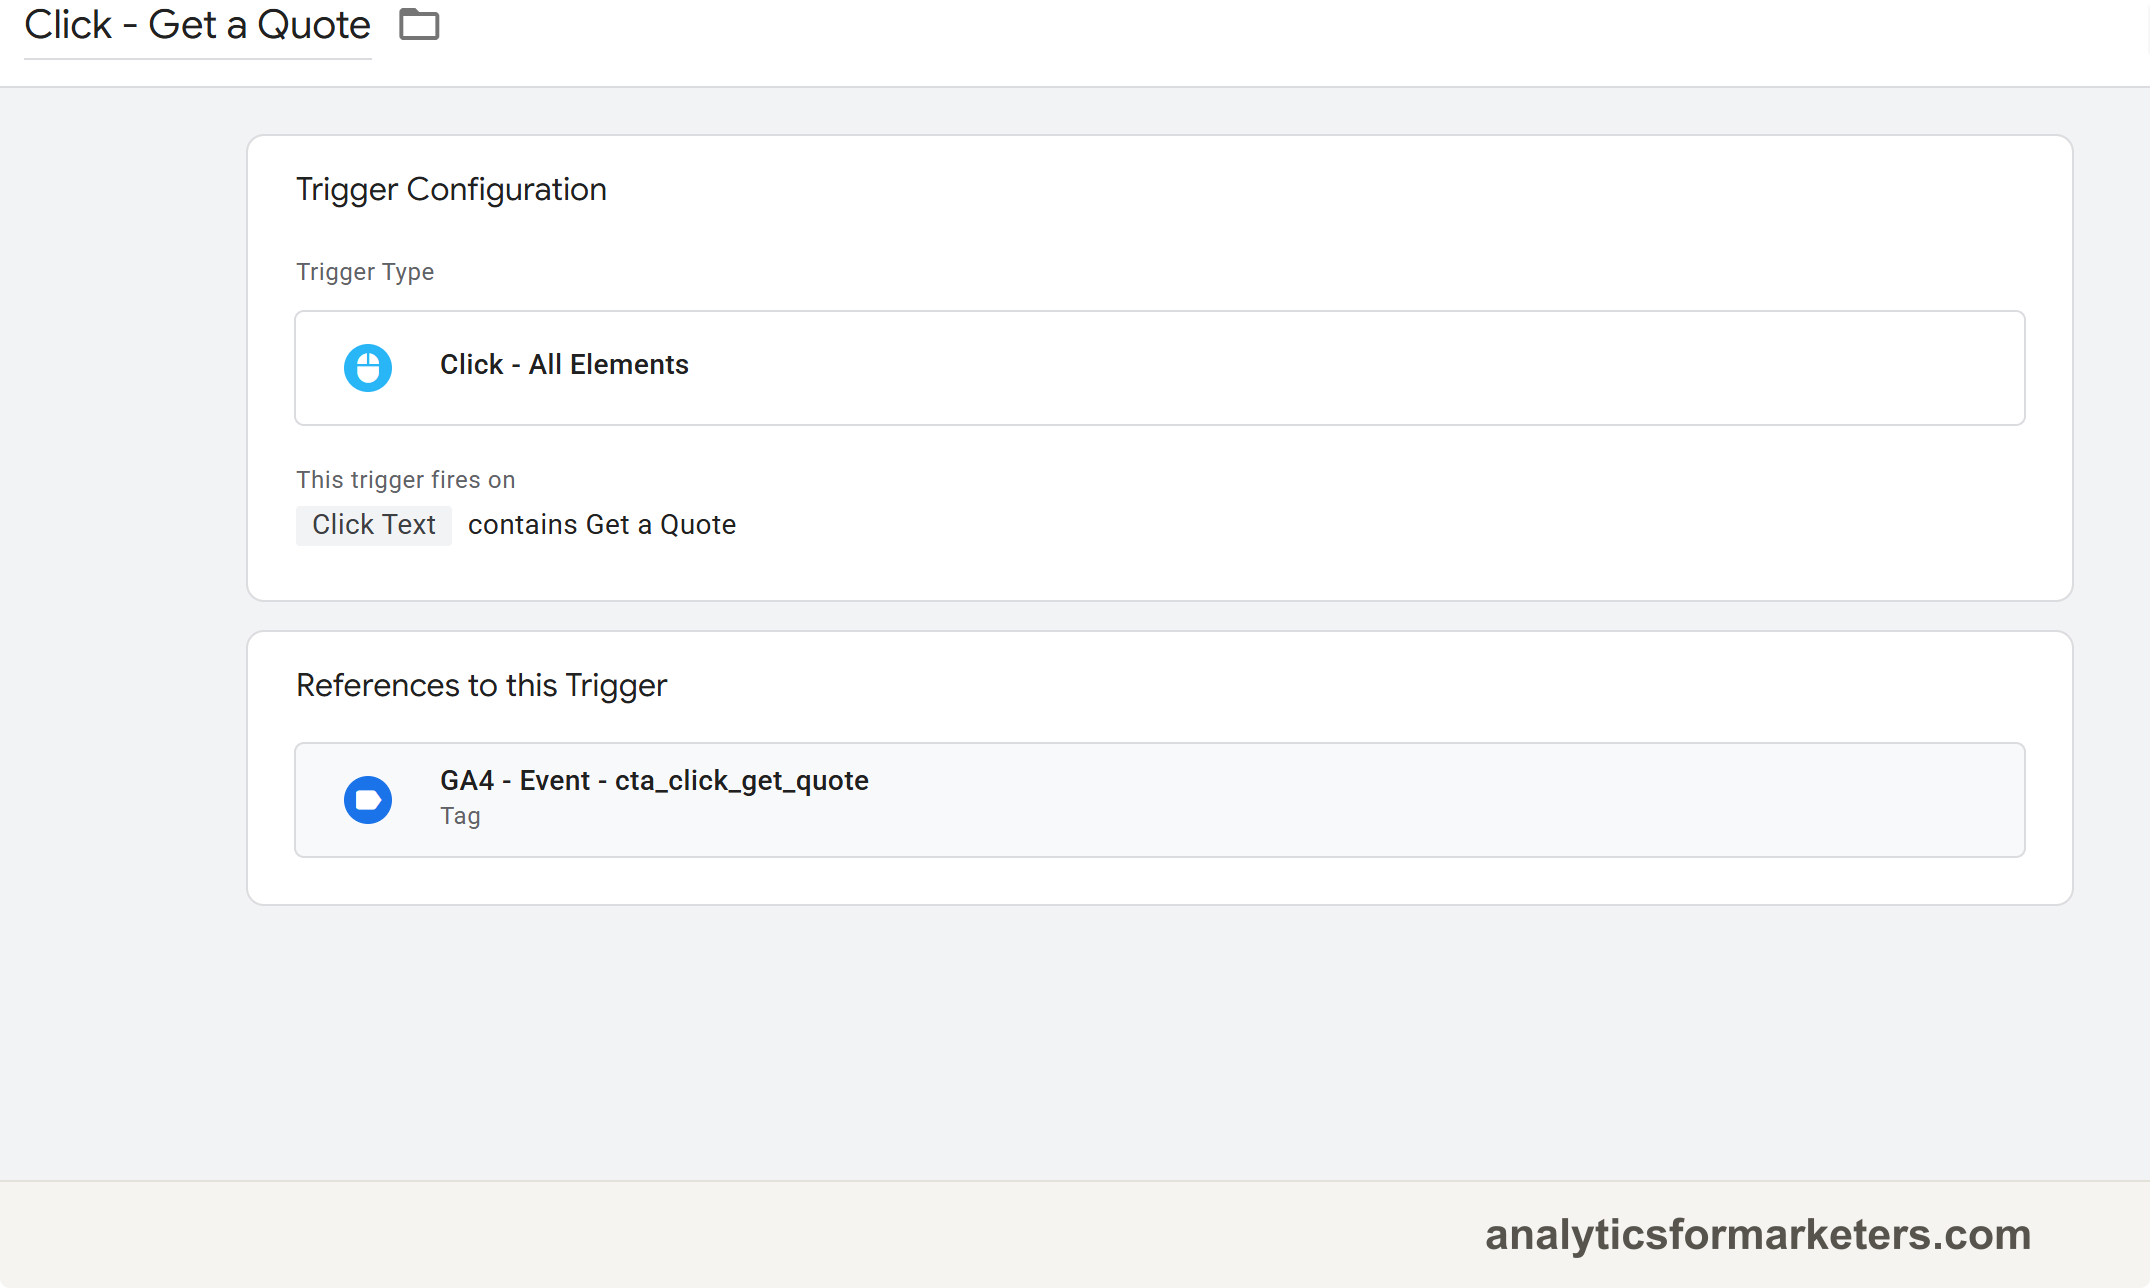
Click Save. You should see your new trigger in the Triggers list with its condition summarized under the name.
Create a GA4 event tag
The trigger knows when to fire. Now build the tag that tells GA4 what happened.
Click Tags in the left menu, then New. Name it to match the trigger, like “GA4 Event - Get a Quote Click.”
Workspace Tags NewClick the tag configuration box and choose Google Analytics: GA4 Event. Two fields matter here:
- Measurement ID: enter your GA4 Measurement ID (the one that starts with G-). The tag loads the Google tag for you and routes the event to the right GA4 property. Older containers may show a Configuration Tag dropdown instead; pick your GA4 tag there.
- Event Name: what this click will be called in GA4 reports. Use lowercase with underscores, and be descriptive:
cta_click_get_quoteAn event in GA4 is a recorded interaction, and the name is how you’ll find it in every report, so pick something future-you will understand. If you want the deeper background on naming and how events flow into reports, see how GA4 events work.
Optional but recommended: expand Event Parameters and add context. A parameter is an extra detail attached to the event.
link_textwith value{{Click Text}}page_urlwith value{{Page URL}}
The double curly braces tell GTM to fill in the variable’s value at click time.
Finally, scroll down to Triggering, click it, and select the click trigger from Step 3. Click Save.
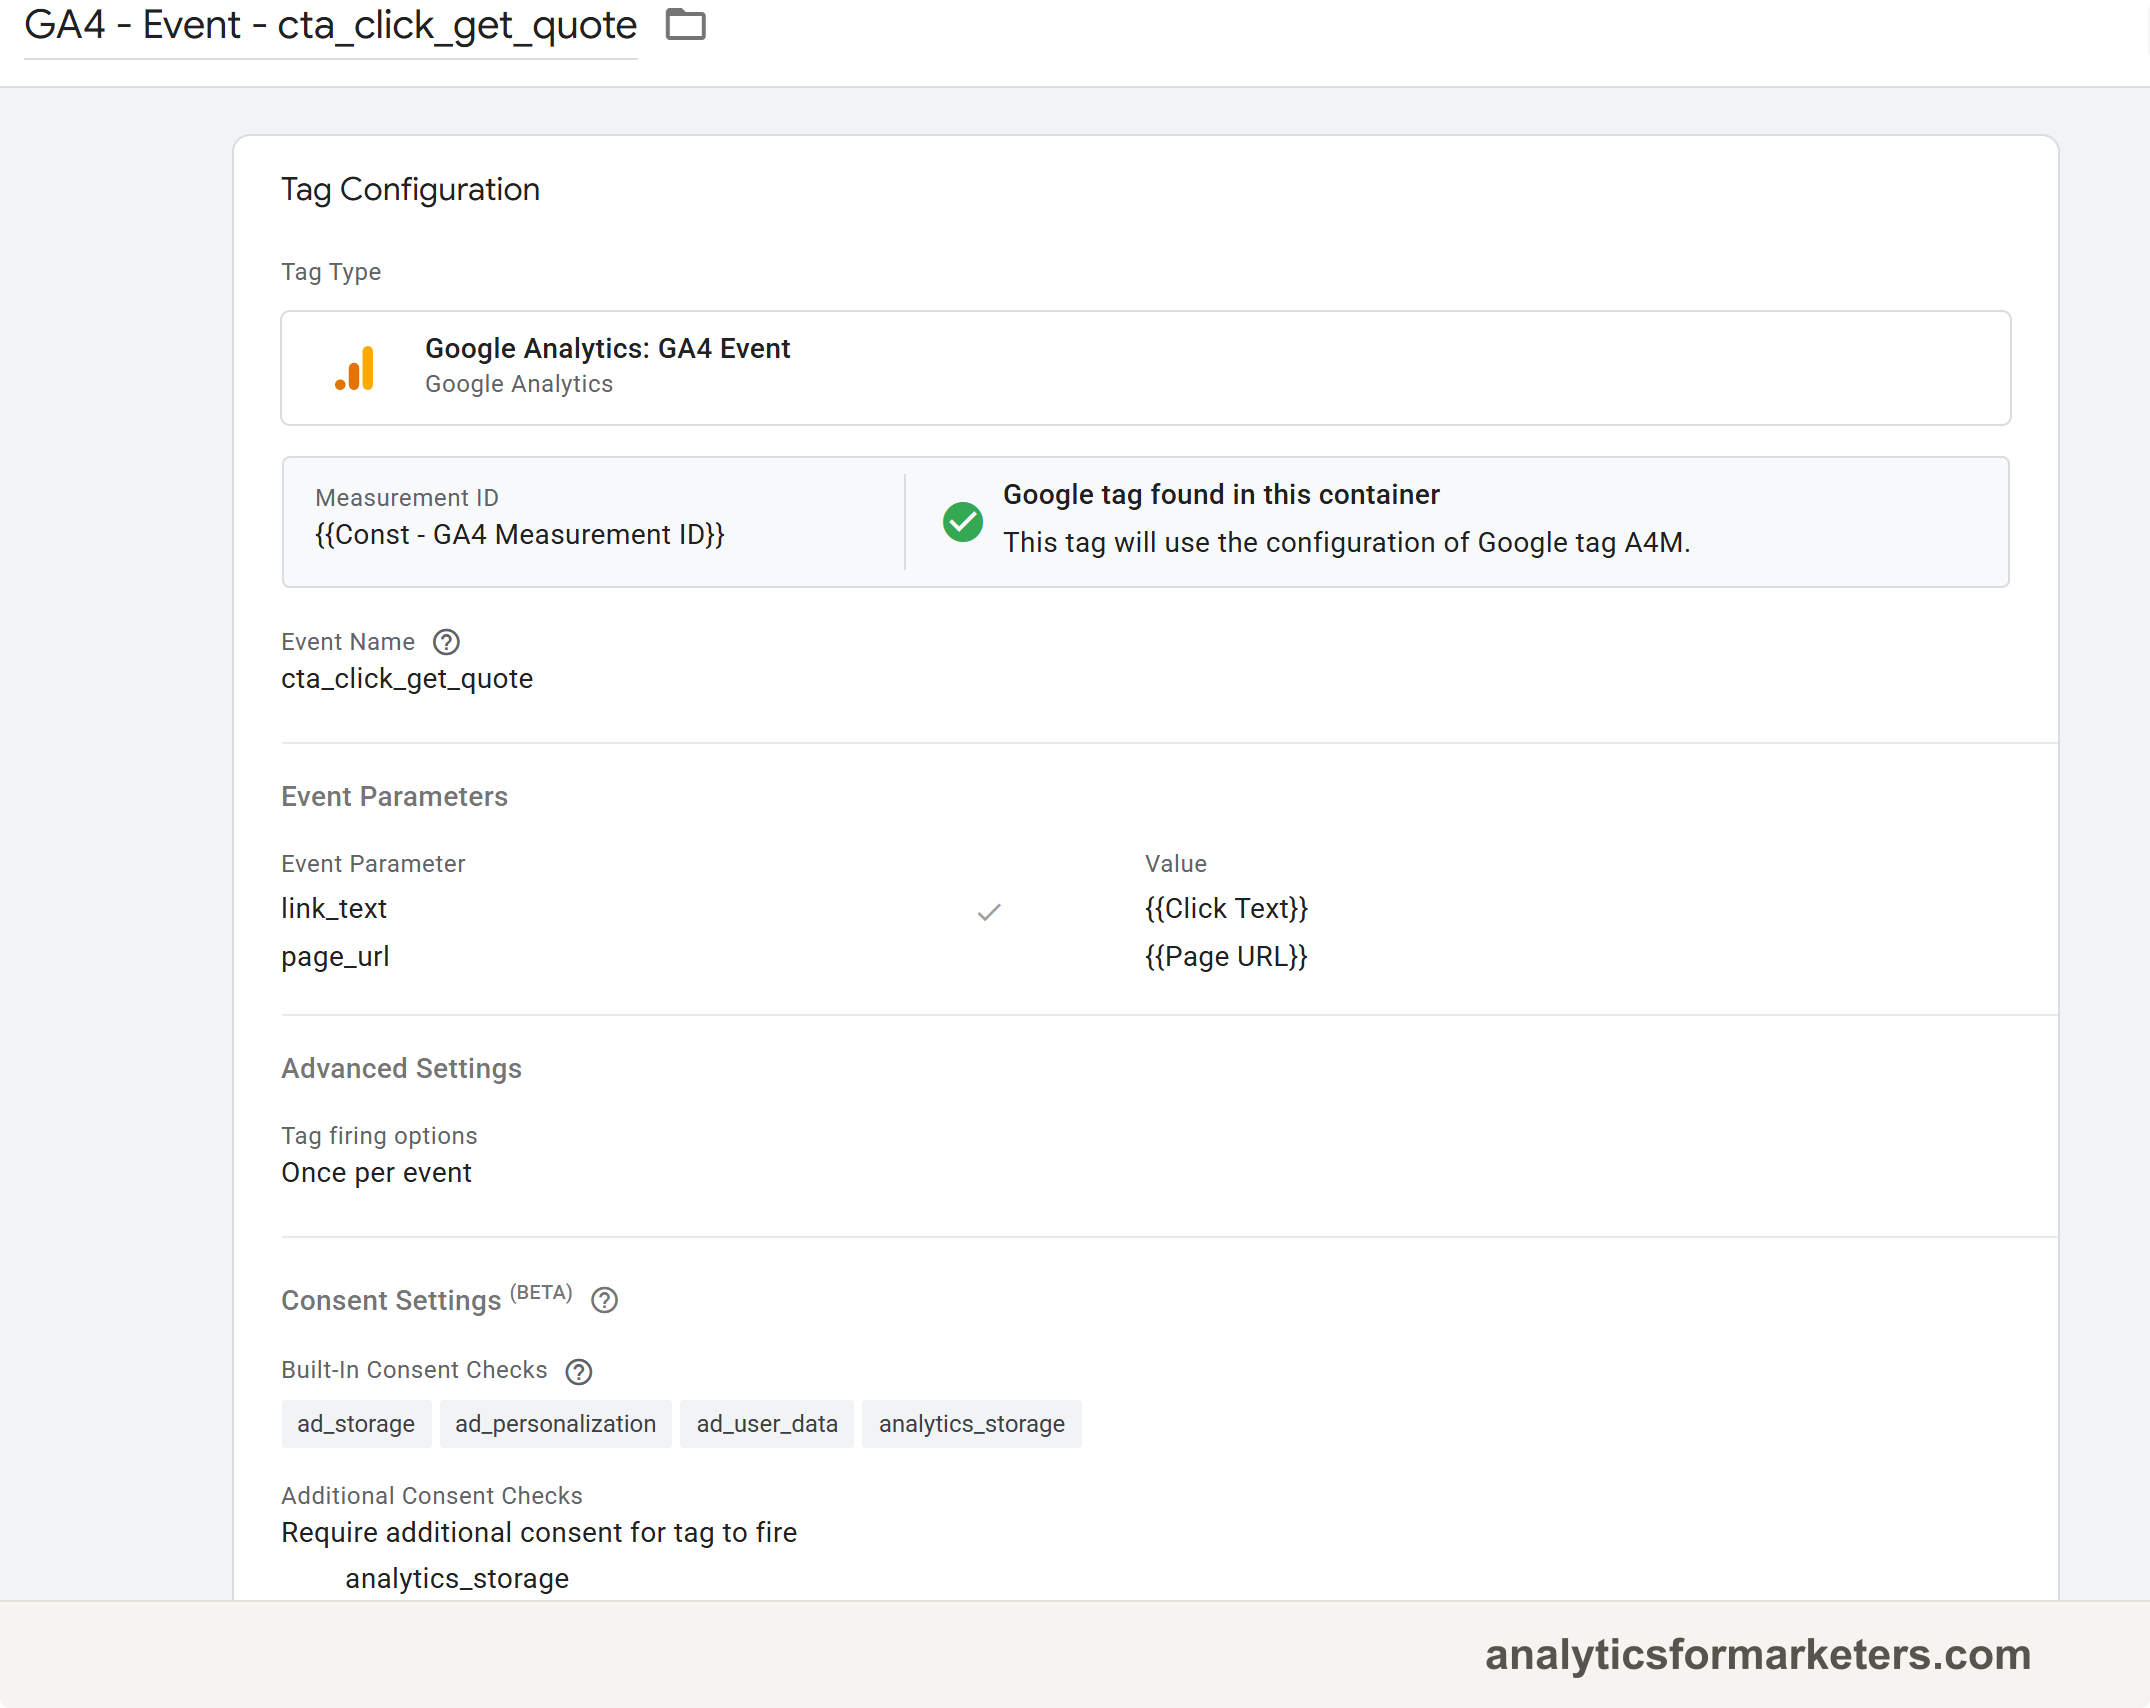
You should see the tag in your Tags list, with your event name in the configuration and the trigger listed beside it.
Test in Preview mode
Nothing is live yet. Click Preview again, connect to your site, go to the page, and click your target button.
In the Tag Assistant debug pane, click the new Click entry in the left timeline. Check two things:
- Your GA4 event tag appears under Tags Fired (not under “Tags Not Fired”).
- Clicking the tag shows the trigger conditions, each with a green check.
Then confirm the data reached GA4. Open GA4 and go to Reports > Realtime. Find the “Event count by Event name” card.
GA4 Reports Realtime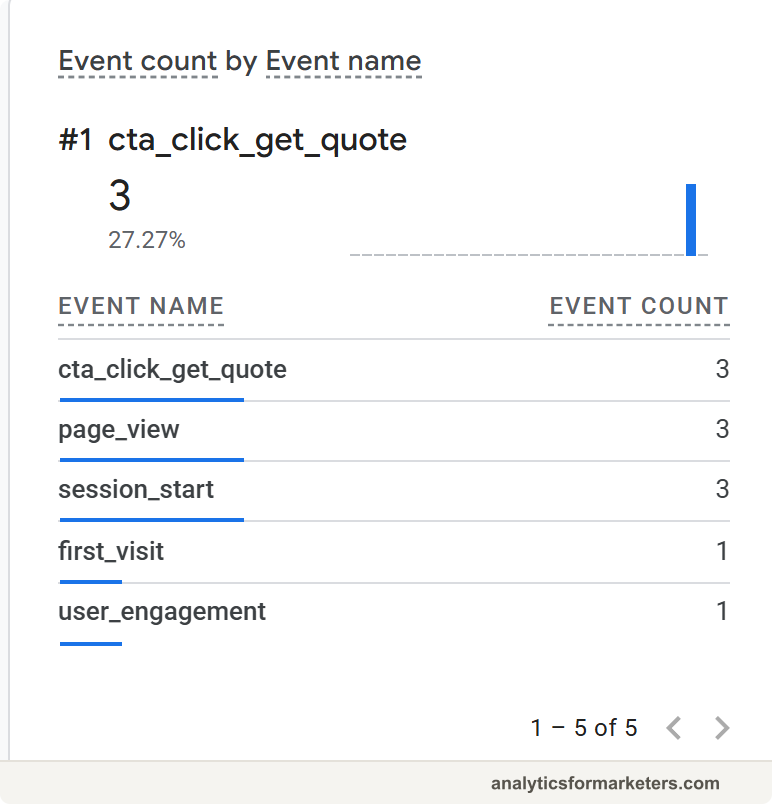
You should see cta_click_get_quote (or your event name) in the list within a few seconds. Click the event name and you’ll see its parameters, including link_text.
If the tag fired in Preview but nothing shows in GA4, skip ahead to the troubleshooting section. The fix is usually the Measurement ID.
Publish
Preview mode only shows changes to you. To track real visitors, publish the container.
Click Submit in the top right, give the version a descriptive name like “Add Get a Quote click tracking,” and click Publish.
Workspace Submit PublishAfter publishing, open your live site in a normal browser tab (no Preview needed), click the button, and check Reports > Realtime in GA4 one more time.
You should see the event arrive within seconds. That’s the whole setup: the click now flows into GA4 for every visitor. Standard reports like Reports > Engagement > Events take 24 to 48 hours to show the new event, so don’t worry when it’s not there tomorrow morning.
Tracking multiple buttons on the same page
Got five CTAs instead of one? You have two options.
Option 1: one trigger and tag per button. Repeat Steps 3 and 4 for each button. This works, but ten buttons means twenty items in your container, and the maintenance adds up.
Option 2: one event, multiple parameters. Build a single trigger that matches all your CTAs (for example, Click Classes contains “cta”), and a single tag with a generic event name:
cta_clickThen add the parameter link_text with the value {{Click Text}}. Every CTA click sends the same cta_click event, and the link_text parameter records which button it was: “Get a Quote”, “Start Free Trial”, “Contact Sales”.
In GA4, one event with a distinguishing parameter is cleaner than ten near-identical events. Web data streams don’t cap the number of distinct event names (the 500-name limit you may have read about applies to app data streams), but a tidy naming scheme still keeps your reports readable. One event name with a link_text parameter beats dozens of one-off event names, and comparing buttons becomes one report instead of ten.
Realtime and DebugView show parameters right away. To use link_text as a column in standard reports, you’ll register it as a custom dimension. That’s a five-minute follow-up once data is flowing.
Bonus: mark the click as a conversion
If this button click represents a business goal (a “Request Demo” click is a lead, not a curiosity), tell GA4 it matters.
Go to Admin > Data display > Events in GA4, find your event name, and click the star icon to mark it as a key event (GA4’s current name for a conversion). It can take a day for a brand-new event name to appear in that list.
For the full walkthrough, including counting methods and sending key events to Google Ads, see the guide to setting up conversions in GA4.
Troubleshooting: when clicks don’t track
The tag fires on every click, not the target button
You selected All Clicks instead of Some Clicks when building the trigger, or your condition is too broad (“Click Text contains e” matches almost everything). Reopen the trigger, switch to Some Clicks, and make the Click Text or Click ID condition more specific.
The click trigger doesn’t fire at all
If you used Click - Just Links but the button isn’t an <a> tag (many buttons are <button> or even <div> elements), the trigger never fires. Switch to Click - All Elements. In Preview mode, check the Click Element variable to see the actual HTML tag you clicked.
The event shows in GTM Preview but not in GA4
If the event fires in Preview but never reaches GA4, check the Measurement ID in the event tag. A typo there sends events nowhere. Open the tag and confirm the G- ID matches your GA4 property exactly (you can copy it from Admin > Data streams in GA4).
You’re tracking the wrong button
Multiple buttons can share the same text (“Learn More” is a common offender). Switch to Click ID or Click Classes for more precise targeting, or combine two conditions in one trigger, like Click Text contains “Learn More” AND Click URL contains “/pricing”.
Once your first button is tracking, the next one takes two minutes: same pattern, new condition, new event name. That pattern (variable, trigger, tag, test, publish) is the core of everything you’ll ever build in Tag Manager.