The fastest reliable way to install Google Analytics 4 on WordPress is the free Site Kit by Google plugin: install it, connect your Google account, and pick your GA4 property. If you'd rather not add an analytics plugin, copy the gtag.js snippet from Admin > Data streams > your stream > View tag instructions and paste it into your site header with a snippet plugin like WPCode.
By the end of this tutorial, you’ll have Google Analytics 4 installed on your WordPress site and confirmed working in the Realtime report. Plan for about 15 minutes.
There are three good ways to do it: the official Site Kit by Google plugin, a dedicated analytics plugin like MonsterInsights, or pasting the tracking code into your site yourself. This guide walks through all three, then shows you how to prove data is actually coming in.
Before you start
You’ll need two things:
- A GA4 property and its Measurement ID. Your Measurement ID is the code starting with
G-that connects your site to Google Analytics. Here’s where to find your Measurement ID if you’re not sure. No GA4 property yet? Our general installation guide covers creating one from scratch, then come back here for the WordPress part. - WordPress admin access. You need an Administrator role so you can install plugins or edit theme files.
This guide assumes self-hosted WordPress (you installed WordPress on your own hosting). On WordPress.com, any paid plan can install plugins as of April 2026; only the free plan can’t. See the FAQ at the bottom for details.
Which method should you use?
| Method | Cost | What you get | Watch out for |
|---|---|---|---|
| Site Kit by Google | Free | The official Google plugin. Installs the tag for you and shows GA4 reports inside wp-admin. | Fewer extras than paid analytics plugins |
| MonsterInsights | Free core, paid tiers | A guided setup wizard plus features like form and ecommerce tracking on paid plans | The best features cost money |
| Manual gtag.js code | Free | No analytics plugin at all. You control exactly where the code lives. | Code pasted into a theme disappears when the theme updates or changes. Use WPCode or a child theme. |
For most people, Site Kit is the right pick. It’s free, it’s made by Google, it takes the copy-paste errors out of the picture (though you still need to select the right property), and it puts your top reports inside the WordPress dashboard where you already work.
One more option worth knowing about: if you’re managing several tags (GA4, ad pixels, a heatmap tool), consider installing GA4 through Google Tag Manager instead. Tag Manager holds all your tags in one container, so you add or change them without touching WordPress again.
Method 1: Site Kit by Google (recommended)
Install and activate Site Kit
In your WordPress dashboard, go to Plugins > Add New Plugin and search for Site Kit by Google. Click Install Now, then Activate. You can also download it from the WordPress plugin directory.
wp-admin Plugins Add New PluginYou should see a banner at the top of your dashboard inviting you to set up Site Kit.
Connect your Google account
Click Start setup. Site Kit sends you to Google to sign in.
Sign in with the Google account that has access to your GA4 property. If your agency or a coworker created the property, this part fails with the wrong account, so double-check before you click through.
Google shows a few permission screens asking Site Kit to see your site data. Approve them. Site Kit then verifies that you own the site automatically, with no code or DNS records needed.
Connect Analytics
During setup, check the box to Connect Google Analytics as part of your setup if it’s offered. Otherwise, finish the basic setup, then go to Site Kit > Settings > Connect More Services and click Set up Google Analytics.
Pick your Analytics account, property, and web data stream from the dropdowns. The stream should match the Measurement ID you found earlier.
Click Complete setup. Site Kit places the GA4 tag on every page of your site for you.
Check the Site Kit dashboard
Go to Site Kit > Dashboard. Analytics should be listed as connected, and within a day or two you’ll see traffic charts appear right here in wp-admin.
Analytics marked as connected in Site Kit. The charts stay empty at first; that’s normal. Skip ahead to the Verify section below to confirm data is flowing right now.
Method 2: MonsterInsights
MonsterInsights is a popular third-party analytics plugin. The free version installs GA4 and adds a reports dashboard; paid tiers add form tracking, ecommerce tracking, and more.
Install and activate MonsterInsights
Go to Plugins > Add New Plugin and search for MonsterInsights. Click Install Now, then Activate. It’s also available in the WordPress plugin directory.
Run the setup wizard
The wizard launches after activation. Pick the category that fits your site (business, publisher, or ecommerce), then click Save and Continue. If you bought a paid plan, the wizard may ask for your license key here. On the next screen, click Connect MonsterInsights.
Sign in with the Google account that has access to your GA4 property, approve the permissions, and choose your property from the dropdown. Click Complete Connection.
Finish and confirm
The wizard offers recommended settings and some paid upsells. You can accept the defaults and skip the upsells; the tracking code is already live.
Go to Insights > Reports. Once data accumulates you’ll see an overview report here inside wp-admin.
Method 3: Paste the code manually
No plugin bloat, full control. You’ll copy the gtag.js snippet from GA4 and paste it into your site’s header. In plain English, gtag.js is the small piece of JavaScript that sends visit data from your pages to Google Analytics.
Copy your gtag.js snippet from GA4
In Google Analytics, go to Admin > Data streams and click your web stream. In the panel that slides in, click View tag instructions, then the Install manually tab.
Admin Data streams your web stream View tag instructions Install manually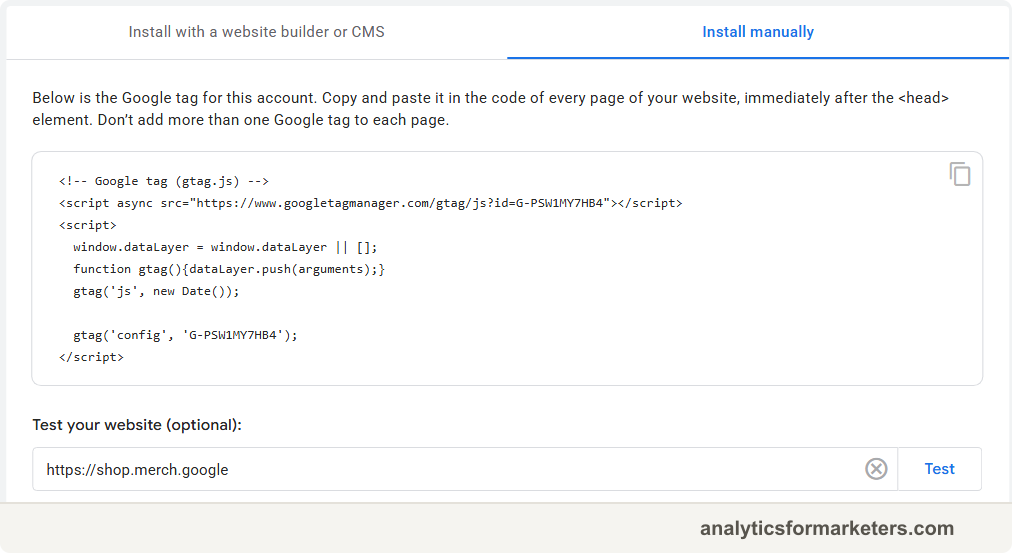
Copy the whole code block. It looks like this, with your own Measurement ID in place of the placeholder:
<!-- Google tag (gtag.js) -->
<script async src="https://www.googletagmanager.com/gtag/js?id=G-XXXXXXXXXX"></script>
<script>
window.dataLayer = window.dataLayer || [];
function gtag(){dataLayer.push(arguments);}
gtag('js', new Date());
gtag('config', 'G-XXXXXXXXXX');
</script>Install WPCode
The snippet needs to sit in the <head> section of every page. The safest way to put it there is a header plugin, and WPCode is the standard choice.
Go to Plugins > Add New Plugin, search for WPCode, then click Install Now and Activate. You can also grab it from the WordPress plugin directory: search for “WPCode” and pick the plugin by WPCode, formerly known as Insert Headers and Footers.
Paste the snippet into the Header box
Go to Code Snippets > Header & Footer. Paste your gtag.js snippet into the Header box, then click Save Changes.
wp-admin Code Snippets Header & FooterWPCode now outputs the snippet on every page, and it keeps working if you switch themes later.
You can paste the snipp
et directly into your theme’s header.php file, right before the closing </head> tag. Do it in a child theme: a small companion theme that holds your customizations so theme updates don’t erase them. If you edit the parent theme’s header.php directly, the next theme update deletes your tracking code without warning.
Never run two of these methods at once. Site Kit plus a manual snippet means the GA4 tag fires twice on every page, so every visitor and pageview gets counted twice and your data is inflated from day one. If you’re switching methods, remove the old one first: deactivate the plugin or delete the pasted snippet.
Verify it’s working
This is the part people skip. Don’t skip it. Two minutes now saves you discovering a broken setup a month from now.
- Open your website in a new tab and click through 2 or 3 pages.
- In GA4, go to Reports > Realtime. The Realtime report shows activity on your site within seconds, unlike standard reports which lag by a day or two.
- Look at the Users in last 30 minutes card.
At least one user (you), plus the pages you visited in the Views by Page title card. If you see that, the installation works. You’re done.
Troubleshooting
Nothing in Realtime? Work through these in order.
A caching plugin is serving old pages. Caching plugins (WP Rocket, W3 Total Cache, LiteSpeed Cache) store finished copies of your pages so they load f
aster. Those stored copies were built before you added the tracking code. Find the purge cache or clear cache button in your caching plugin and click it, then retest. If your host has its own cache (many managed WordPress hosts do), clear that too.
An ad blocker or consent tool is blocking the tag. Ad blockers and privacy extensions routinely block GA4, so your own browser may be the problem. Retest in a private window with extensions off. If your site runs a cookie consent banner, GA4 may only load after a visitor clicks accept, so accept the banner during your test.
Your ID starts with UA- instead of G-. An ID starting with UA- belongs to Universal Analytics, the old version of Google Analytics that stopped collecting data in July 2023. GA4 IDs start with G-. If you pasted a UA- ID, go back to find your GA4 Measurement ID and swap it in.
Realtime works but standard reports are empty. That’s normal. Standard reports take 24 to 48 hours to populate after installation. If Realtime shows your visits, the tag is fine. Come back tomorrow.
What to do next
GA4 is installed and collecting data. Two moves make that data actually useful:
- Set up event tracking. Out of the box, GA4 records pageviews and scrolls, but the actions that matter to your business (form submissions, button clicks, sign-ups) need events. Follow our guide to setting up events in GA4.
- Flag your key events. Once your important events exist, mark them as key events (GA4’s word for conversions) so your reports show what drives results, not raw traffic.
And if GA4 itself still feels unfamiliar, the GA4 beginner’s guide walks through the reports and concepts you’ll use every week.